1. Download file Install onedrive
2. Unzip file
3. Install
cd onedrive-d-old-future/
./install.sh
4. run command ondrive-pref
ondrive-pref ทำตามลิ้งนี้ สำคัญมาก
* ถ้าไม่มี Folder onedrive ในเครื่องแนะนำให้สร้างก่อนไว้ที่ /home/user/onedrive
5. run command onedrive-d start เพื่อให้ onedrive syn ข้อมูล
อ้างอิง
1. https://zecheru.com/install-onedrive-on-ubuntu/
2. https://github.com/xybu/onedrive-d-old
3. http://www.makeuseof.com/tag/synchronize-files-ubuntu-onedrive/
Wednesday, September 28, 2016


Monday, September 12, 2016
command
Command:
1.lastlog -b 0 -t 10 (las login 10 d)
2.echo 'p@ssw0rds' | smbclient //172.16.0.240/netlogon -UAdministrator -c 'ls'
3.cd Document\ Center\ and\ fife\ sharing/
4.เอา #comment ออกเหลือแต่ค่า configure
4.1 mv /etc/squid/squid.conf /etc/squid/squid.conf.bkp
4.2
grep -Eiv '(^#|^$)' /etc/squid/squid.conf.bkp
or
grep -ve ^# -ve ^$ /etc/squid/squid.conf.bkp > /etc/squid/squid.conf
4.3 ps
ps -ae --forest | grep apache2
4.4 watch
watch -n 2 'ps -aef | grep firefox'
5. Check linux OS 32bit & 64bit
dpkg --print-architecture
getconf LONG_BIT
arch
uname -m
1.lastlog -b 0 -t 10 (las login 10 d)
2.echo 'p@ssw0rds' | smbclient //172.16.0.240/netlogon -UAdministrator -c 'ls'
3.cd Document\ Center\ and\ fife\ sharing/
4.เอา #comment ออกเหลือแต่ค่า configure
4.1 mv /etc/squid/squid.conf /etc/squid/squid.conf.bkp
4.2
grep -Eiv '(^#|^$)' /etc/squid/squid.conf.bkp
or
grep -ve ^# -ve ^$ /etc/squid/squid.conf.bkp > /etc/squid/squid.conf
4.3 ps
ps -ae --forest | grep apache2
4.4 watch
watch -n 2 'ps -aef | grep firefox'
5. Check linux OS 32bit & 64bit
dpkg --print-architecture
getconf LONG_BIT
arch
uname -m
ติดตั้ง stickynotes ใน ubuntu
ติดตั้ง Indecator Sticknotes
sudo add-apt-repository ppa:umang/indicator-stickynotes
sudo apt-get update
sudo apt-get install indicator-stickynotes
sudo add-apt-repository ppa:umang/indicator-stickynotes
sudo apt-get update
sudo apt-get install indicator-stickynotes
Scan network by: netdiscover
1. Install
2. Use
sudo netdiscover -r 192.168.0.0/24 -i enp1s0
Example:

Ref.
how-to-find-all-the-used-ip-addresses-on-a-network
sudo apt-get install netdiscover2. Use
sudo netdiscover -r 192.168.0.0/24 -i enp1s0
Example:

Ref.
how-to-find-all-the-used-ip-addresses-on-a-network
Wednesday, September 7, 2016
how to monitor linux server
Install package following page: quick-install-linux-dash-linux
Installation and Prerequisites
A CentOS 7 and Ubuntu 15.10 machine, git, Apache web server, PHP package.Let us install the package with CentOS 7 first
update system
#yum update
Install Apache, php and git packages
#yum -y install httpd git php php-json php-xml php-commonStart httpd service
# systemctl start httpd # systemctl enable httpdChange working directory to /var/www/html
# cd /var/www/htmlDownload linux-dash usiing git# git clone https://github.com/afaqurk/linux-dash.gitRestart apache service
# systemctl restart httpdTo use:/linux-dash Install linux-dash with Ubuntu 15.10
Update system
# apt-get updateInstall required packages
# apt-get install apache2 curl php5 php5-curl php5-json gitChange working directory to /var/www/html or your web directory Download package
git clone https://github.com/afaqurk/linux-dash.gitStart apache service
# /etc/init.d/apache2 start
Open Browser and start linux-dash monitoring system
/linux-dash
Tuesday, August 23, 2016
bypass web proxy-ต้องการ Bypass บางเว็บไม่ให้ต้อง Authen user name and password จาก Web proxy
ต้องการ Bypass บางเว็บไม่ให้ต้อง Authen user name and password จาก Web proxy
ตย. เปิด ms office 2012 (Excel) แล้วมันจะโหลดเข้าไปที่เว็บไซต์ของ microsoft.com ตลอด จึง Alert pop-up ให้ Authentication ถ้าหากปิด IE ไม่ให้ใช้ Web proxy จึงจะไม่มี alert มากวนใจ ลองแก้ไขตามนี้ สามารถปิด alert ดังกล่าวได้
Link: how-to-get-rid-of-prompts-for-credentials-connecting-to-proxy-server-officeimg-v

Sunday, August 21, 2016
install ntp ntpdate Time server
sudo apt-get install ntp ntpdate
# cp /etc/ntp.conf /etc/ntp.conf.bak
#vim /etc/ntp.conf
-------------------------------------------------------------
1.# Add log file
logfile /var/log/ntp.log
2.# Specify one or more NTP servers. (For server Thailand)
server time.navy.mi.th dynamic
server time.nist.gov dynamic
server clock.nectec.or.th dynamic
3.# Loclal clock and Backup
server 127.127.1.0 # local clock
fudge 127.127.1.0 stratum 10


# cp /etc/ntp.conf /etc/ntp.conf.bak
#vim /etc/ntp.conf
-------------------------------------------------------------
1.# Add log file
logfile /var/log/ntp.log
2.# Specify one or more NTP servers. (For server Thailand)
server time.navy.mi.th dynamic
server time.nist.gov dynamic
server clock.nectec.or.th dynamic
3.# Loclal clock and Backup
server 127.127.1.0 # local clock
fudge 127.127.1.0 stratum 10
4.# Add network
# Local users may interrogate the ntp server more closely.
restrict 127.0.0.1
restrict ::1
restrict 192.168.1.0 mask 255.255.255.0 nomodify notrap
restrict 192.168.0.0 mask 255.255.255.0 nomodify notrap
restrict 172.16.106.0 mask 255.255.255.0 nomodify notrap
---------------------------Save & exit---------------------------
#/etc/init.d/ntp restart
#ntpq -pn

#ntpdc -c sysinfo
Saturday, August 20, 2016
Set open vpn จาก Server ทั่วโลก
Free openvpn link: free-vpn-providers-of-2015
ตัวอย่างด้านล่างเป็น VPN network on Asia
1. เข้าไปเลือก VPN gateway จาก Web site http://www.vpngate.net/en/
username:'vpn', password:'vpn'

2. เปิด Terminal แล้วเข้าไปยังที่เก็บไฟล์ .ovpn ที่ดาวน์โหลดมา ตัวอย่างด้านล่าง เก็บไฟล์ไว้ที่ /home/user/Download/Japan แล้วรันคำสั่งต่อไปนี้
sudo openvpn Japan/vpngate_vpn585905277.opengw.net_tcp_1454.ovpn

3. ตรวจสอบไอพี่ที่ได้ จากเว็บไซต์ securitykiss.com

4. หรือตรวจสอบจากเว็บไซต์ www.myipaddress.com

อ้างอิงการเซท Open VPN
howto-setup-openvpn-on-ubuntu
ตัวอย่างด้านล่างเป็น VPN network on Asia
1. เข้าไปเลือก VPN gateway จาก Web site http://www.vpngate.net/en/
username:'vpn', password:'vpn'

2. เปิด Terminal แล้วเข้าไปยังที่เก็บไฟล์ .ovpn ที่ดาวน์โหลดมา ตัวอย่างด้านล่าง เก็บไฟล์ไว้ที่ /home/user/Download/Japan แล้วรันคำสั่งต่อไปนี้
sudo openvpn Japan/vpngate_vpn585905277.opengw.net_tcp_1454.ovpn

3. ตรวจสอบไอพี่ที่ได้ จากเว็บไซต์ securitykiss.com

4. หรือตรวจสอบจากเว็บไซต์ www.myipaddress.com

อ้างอิงการเซท Open VPN
howto-setup-openvpn-on-ubuntu
vpn securitykiss.com, Fake vpn
ลองไปอยู่ต่างประเทศกันไหม อิอิ...
จะทำอะไรดีน่ะ...
1. ลงทะเบียนสมัคบัญชีใช้งาน https://securitykiss.com
2. ตรวจสอบ user name & passwd ที่ Email
3. Login: VPN


9. Create VPN
 10.
10.

11. เปิดไฟล์ README.txt แล้วใส่ค่าด้านล่าง เสร็จแล้วคลิ๊ก Advanced เพื่อปรับค่าอีก

12. การปรับค่า Advanced...
 13. ใช้งาน VPN

14. open website https://securitykiss.com กด Refresh จะเห็นว่า ตอนนี้เราอยู่ Germany แล้วจากเดิมอยู่เมืองไทย

อ้างอิง How To Setup Free VPN Service On Kali Linux For Anonymity
จะทำอะไรดีน่ะ...
1. ลงทะเบียนสมัคบัญชีใช้งาน https://securitykiss.com
2. ตรวจสอบ user name & passwd ที่ Email
3. Login: VPN

4.

5. ทำตามข้อ 1,2,3

6.เลือกไฟล์ Download

7. Unzip ออกมาแล้วเปิดไฟล์ README.txt เพื่อนำค่าไปเซท VPN
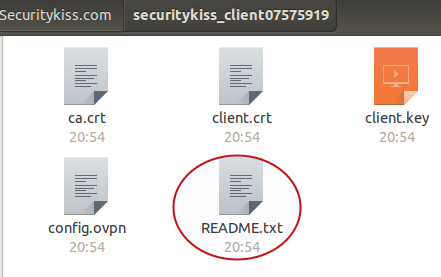
8. สิ่งที่ต้องใช้คือ GW, Proto, Port

9. Create VPN
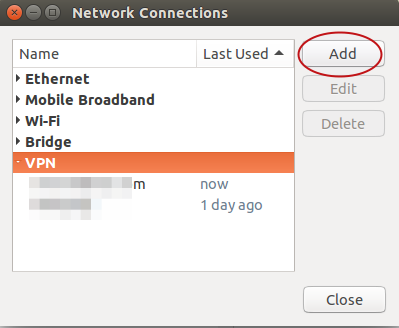

11. เปิดไฟล์ README.txt แล้วใส่ค่าด้านล่าง เสร็จแล้วคลิ๊ก Advanced เพื่อปรับค่าอีก

12. การปรับค่า Advanced...


14. open website https://securitykiss.com กด Refresh จะเห็นว่า ตอนนี้เราอยู่ Germany แล้วจากเดิมอยู่เมืองไทย

อ้างอิง How To Setup Free VPN Service On Kali Linux For Anonymity
Subscribe to:
Posts (Atom)