Thursday, March 7, 2019

saslauthd + postfix + debian 9

1. install debian 9

2. install postfix

apt install postfix mailutils dovecot-core dovecot-imapd

ref: install-postfix-mail-server-with-webmail-in-debian

3. install saslauthd
apt install sasl2-bin

4. vim /etc/default/saslauthd

START=yes
NAME="saslauthd"
MECHANISMS="pam"
OPTIONS="-c -m /var/spool/postfix/var/run/saslauthd"

5. create file smtpd.conf
vim /etc/postfix/sasl/smtpd.conf

pwcheck_method: saslauthd
mech_list: PLAIN LOGIN

6. edit /etc/postfix/master.conf

## Enable SMTP on port 587 only for authenticated/TLS clients
submission inet n       -       -       -       -       smtpd
  -o smtpd_enforce_tls=yes
  -o smtpd_sasl_auth_enable=yes
  -o smtpd_client_restrictions=permit_sasl_authenticated,reject
## Enable SMTP on port 465 only for authenticated/SSL clients
smtps     inet  n       -       -       -       -       smtpd
  -o smtpd_tls_wrappermode=yes
  -o smtpd_sasl_auth_enable=yes
  -o smtpd_client_restrictions=permit_sasl_authenticated,reject

7. create SSL

mkdir /etc/postfix/ssl
cd /etc/postfix/ssl/
openssl genrsa -des3 -rand /etc/hosts -out smtpd.key 1024
chmod 600 smtpd.key
openssl req -new -key smtpd.key -out smtpd.csr
openssl x509 -req -days 3650 -in smtpd.csr -signkey smtpd.key -out smtpd.crt
openssl rsa -in smtpd.key -out smtpd.key.unencrypted
mv -f smtpd.key.unencrypted smtpd.key
openssl req -new -x509 -extensions v3_ca -keyout cakey.pem -out cacert.pem -days 3650

Ref: Setup SSL

8.  edit postfix

vim /etc/postfix/main.cf
# See /usr/share/postfix/main.cf.dist for a commented, more complete version

# Debian specific:  Specifying a file name will cause the first
# line of that file to be used as the name.  The Debian default
# is /etc/mailname.
#myorigin = /etc/mailname

smtpd_banner = $myhostname ESMTP $mail_name (Debian/GNU)
biff = no

# appending .domain is the MUA's job.
append_dot_mydomain = no

# Uncomment the next line to generate "delayed mail" warnings
#delay_warning_time = 4h

readme_directory = no

# See http://www.postfix.org/COMPATIBILITY_README.html -- default to 2 on
# fresh installs.
compatibility_level = 2

# TLS parameters
smtpd_tls_key_file = /etc/postfix/ssl/smtpd.key
smtpd_tls_cert_file = /etc/postfix/ssl/smtpd.crt
smtpd_tls_CAfile = /etc/postfix/ssl/cacert.pem
smtpd_use_tls=yes
smtpd_tls_loglevel = 1
smtpd_tls_received_header = yes
smtpd_tls_session_cache_timeout = 3600s
smtpd_tls_session_cache_database = btree:${data_directory}/smtpd_scache
smtp_tls_session_cache_database = btree:${data_directory}/smtp_scache

# See /usr/share/doc/postfix/TLS_README.gz in the postfix-doc package for
# information on enabling SSL in the smtp client.

smtpd_relay_restrictions = permit_mynetworks permit_sasl_authenticated defer_unauth_destination
myhostname = server.domain.com
mydomain = domain.com
alias_maps = hash:/etc/aliases
alias_database = hash:/etc/aliases
myorigin = /etc/mailname
mydestination = $myhostname, server.domain.com, domain.com, localhost.domain.com, , localhost
relayhost = 
#mynetworks = 127.0.0.0/8 [::ffff:127.0.0.0]/104 [::1]/128
mynetworks = 172.16.0.0/16, 192.168.0.0/16, 127.0.0.0/8, 10.10.12.0/24, 10.10.13.0/24, 10.10.14.0/24, 10.10.15.0/24, 10.10.18.0/24, 10.10.19.0/24
mailbox_size_limit = 0
recipient_delimiter = +
inet_interfaces = all
inet_protocols = all

home_mailbox = Maildir/

# SMTP-Auth settings
smtpd_sasl_type = dovecot
smtpd_sasl_path = private/auth
smtpd_sasl_auth_enable = yes
smtpd_sasl_security_options = noanonymous
smtpd_sasl_local_domain = $myhostname
smtpd_recipient_restrictions = permit_sasl_authenticated,permit_mynetworks,permit_auth_destination,reject

9. configure iptables

# Install IPTables Persistent Package
apt-get install -y iptables-persistent
# Add netfilter-persistent Startup
invoke-rc.d netfilter-persistent save
# Start netfilter-persistent Service
service netfilter-persistent start

root@mailgw:~# iptables -A INPUT -i lo -j ACCEPT
root@mailgw:~# iptables -A OUTPUT -o lo -j ACCEPT
root@mailgw:~# iptables -A INPUT -p icmp -m icmp --icmp-type 8 -j ACCEPT
root@mailgw:~# iptables -A INPUT -m state --state RELATED,ESTABLISHED -j ACCEPT
root@mailgw:~# iptables -A OUTPUT -m state --state NEW,RELATED,ESTABLISHED -j ACCEPT
#Add rule

iptables -A INPUT -i lo -j ACCEPT
iptables -A OUTPUT -o lo -j ACCEPT
iptables -A INPUT -p icmp -m icmp --icmp-type 8 -j ACCEPT
iptables -A INPUT -m state --state RELATED,ESTABLISHED -j ACCEPT
iptables -A OUTPUT -m state --state NEW,RELATED,ESTABLISHED -j ACCEPT
iptables -A INPUT -p tcp -s 13.228.34.209 -m tcp --dport 25 -j ACCEPT
iptables -A INPUT -p tcp -m tcp --dport 55001 -j ACCEPT
iptables -A INPUT -p tcp -m tcp --dport 25 -j ACCEPT
iptables -A INPUT -p tcp -m tcp --dport 80 -j ACCEPT
iptables -A INPUT -p tcp -m tcp --dport 143 -j ACCEPT
iptables -A INPUT -p tcp -m tcp --dport 465 -j ACCEPT
iptables -A INPUT -p tcp -m tcp --dport 587 -j ACCEPT
iptables -A INPUT -p udp -m udp --dport 161 -j ACCEPT
iptables -A INPUT -p udp -m udp --dport 162 -j ACCEPT
iptables -A INPUT -j DROP
iptables -A FORWARD -j DROP
iptables -A OUTPUT -j DROP

For save rule
CentOS
#/sbin/service iptables save
#service netfilter-persistent restart

For View rule
#iptables -t filter -L INPUT --line-numbers -n
service netfilter-persistent restart
#iptables -L -v
#iptables -L --line-numbers

For Insert rul
#iptables -I INPUT 45 -p tcp -m tcp --dport 8081 -j ACCEPT
-I คือ Insert
45 คือลำดับที่ 45 ใน INPUT

Fore Delete rule
#iptables -D INPUT numbers
example:
#iptables -D INPUT 10


Ref: easy-debian-9-server-firewall/

Thursday, February 21, 2019

check hard disk status Raid 10

Install the new storcli to manage (LSI/AVAGO/Broadcom) MegaRAID controller under CentOS 7

Check Raid on CentOs 7
lspci | grep Mega
lspci | grep -i raid
download and install

1. Download Software

2. Install

unzip 007.0709.0000.0000_Unified_StorCLI.zip
unzip Unified_storcli_all_os.zip
yum install ./Unified_storcli_all_os/Linux/storcli-007.0709.0000.0000-1.noarch.rpm

3. command for check disk on Raid

/opt/MegaRAID/storcli/storcli64 /c0 show all              - Long detail
/opt/MegaRAID/storcli/storcli64 /c0 /eall /sall show    - Short detail

4. check serail number
/opt/MegaRAID/storcli/storcli64 /c0/eAll/sAll show all | egrep 'Device attributes|SN|Manufacturer|Model Number|Raw size|Speed'

* mdadm --query --detail /dev/md126

Tuesday, February 12, 2019

การ Base64 Decode

URL Decode

การแกะรหัสจากการดู Message source code mail

https://codebeautify.org/base64-decode

copy เพราะ code ด่านล่างไปวาง แล้วกด decode จะได้ข้อมูลออกมา


Monday, November 26, 2018

ตัวอย่างการ configue relay mail on Centos

Ref: configure-postfix-to-relay-mail-to-an-external-smtp-server-on-centos-7/

Configure Postfix to Relay Mail to an External SMTP Server on CentOS 7

The benefit of having two Postfix servers relaying email to an external SMTP server is redundancy.
This article is part of the Homelab Project with KVM, Katello and Puppet series.

Homelab

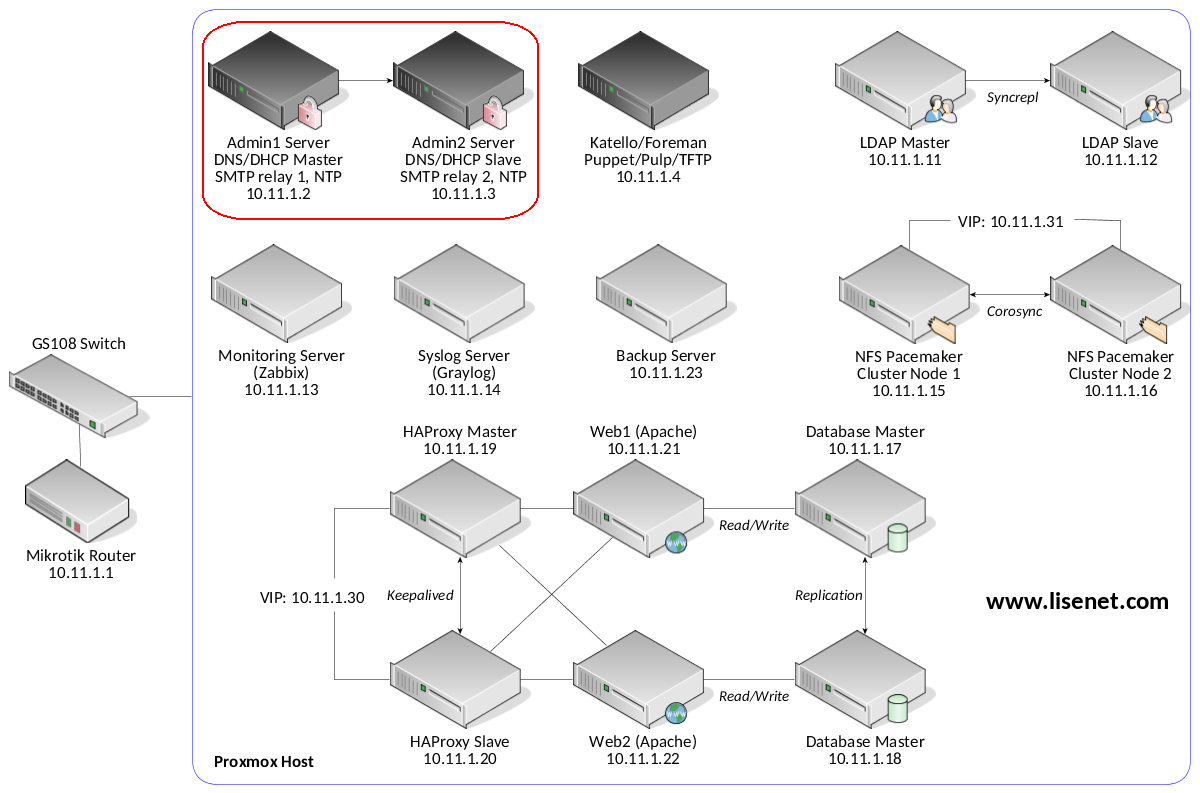
We have two CentOS 7 (minimal) servers installed which we want to configure as follows:
admin1.hl.local (10.11.1.2) – will be configured as a Postfix relay
admin2.hl.local (10.11.1.3) – will be configured as a Postfix relay
Both servers have SELinux set to enforcing mode.
See the image below to identify the homelab part this article applies to.

Software

Software used in this article:
  1. CentOS 7
  2. Postfix 2.10

Install Postfix

Note that this section applies to both servers.
Install Postfix and ensure that the service is enabled:
# yum install postfix cyrus-sasl-plain
# systemctl enable postfix
In case Sendmail is installed, remove it:
# yum remove -y sendmail*
Allow inbount firewall traffic:
# iptables -A INPUT -s 10.11.1.0/24 -p tcp -m state --state NEW --dport 25 -j ACCEPT

Configure Postfix Server as a Relay

Note that this section applies to both servers. Open /etc/postfix/main.cf for editing and configure the following:
smtpd_banner = $myhostname ESMTP
inet_interfaces = all
inet_protocols = ipv4

mynetworks = 127.0.0.0/8, 10.11.1.0/24
relayhost = [mail.example.com]:587
smtp_sasl_auth_enable = yes
smtp_sasl_password_maps = hash:/etc/postfix/sasl_passwd
smtp_sasl_security_options = noanonymous
smtp_tls_CApath = /etc/ssl/certs
smtp_use_tls = yes
Create a new file /etc/postfix/sasl_passwd and add the authentication details of the external SMTP server:
[mail.example.com]:587 user@example.com:passwd
Prevent non-root access:
# chmod 0600 /etc/postfix/sasl_passwd
Create a database file:
# postmap /etc/postfix/sasl_passwd
Check configuration and restart Postfix service:
# postfix check
# systemctl restart postfix

Configure Postfix on a Null Client

When we configure other homelab servers to us Postfix to relay emails via admin1 and admin2, we can have a fallback relay defined (taken from the Postfix configuration file /etc/postfix/main.cf that’s on the Katello server):
relayhost = [admin1.hl.local]
fallback_relay = [admin2.hl.local]
This gives us redundancy in a way so that if one of the SMTP relays is down, we can send emails out via the second one.
Here is an example taken from our Katello server when both relays are operational:
[katello]# echo test|mailx -s TEST user@example.com
Feb 18 18:09:52 katello postfix/pickup[23067]: 328C73D94: uid=0 from=
Feb 18 18:09:52 katello postfix/cleanup[23089]: 328C73D94: message-id=<20180218180952 .328c73d94="" katello.hl.local="">
Feb 18 18:09:52 katello postfix/qmgr[23068]: 328C73D94: from=, size=421, nrcpt=1 (queue active)
Feb 18 18:09:52 katello postfix/smtp[23091]: 328C73D94: to=, relay=admin1.hl.local[10.11.1.2]:25, delay=0.13, delays=0.04/0.02/0.03/0.03, dsn=2.0.0, status=sent (250 2.0.0 Ok: queued as 4A557532)
Feb 18 18:09:52 katello postfix/qmgr[23068]: 328C73D94: removed
We see that email was relayed via admin1. Now, if the admin1 server was down, the email would get relayed via admin2:
Feb 18 18:11:17 katello postfix/pickup[23067]: A81993D96: uid=0 from=
Feb 18 18:11:17 katello postfix/cleanup[23089]: A81993D96: message-id=<20180218181117 .a81993d96="" katello.hl.local="">
Feb 18 18:11:17 katello postfix/qmgr[23068]: A81993D96: from=, size=421, nrcpt=1 (queue active)
Feb 18 18:11:17 katello postfix/smtp[23091]: connect to admin1.hl.local[10.11.1.2]:25: Connection refused
Feb 18 18:11:17 katello postfix/smtp[23091]: A81993D96: to=, relay=admin2.hl.local[10.11.1.3]:25, delay=0.2, delays=0.01/0/0.08/0.11, dsn=2.0.0, status=sent (250 2.0.0 Ok: queued as C9F614D6)
Feb 18 18:11:17 katello postfix/qmgr[23068]: A81993D96: removed


Wednesday, November 14, 2018

Script check server down (Monitor server)

----------------------------------------------Begin--------------------------------------------

#!/bin/bash
SERVERIP=192.168.0.xx
NOTIFYEMAIL=admin@domain.com

ping -c 3 $SERVERIP > /dev/null 2>&1
if [ $? -ne 0 ]
then
   # Use your favorite mailer here:
   echo "Dear Admin team please check LAN interface on this server ip: $SERVERIP" | mail -s "Alert IP: $SERVERIP interface: XXX is down" -r Server-Info@domain.com $NOTIFYEMAIL


----------------------------------------------End----------------------------------------------

#vim checkiponline.sh
------------------------Script check ip online ----------------------------------------------

echo " -------------------------------------------  "
for i in $( ls /sys/class/net ); do echo -n $i; ethtool $i | grep Link\ d; done
echo " -------------------------------------------  "
ip a
echo " -------------------------------------------  "

--------------------------End Script----------------------------------------------------------

Wednesday, August 15, 2018

การเช็คขนาดพื้นที่ แบบเรียงจากน้อยไปมาก du -h

1. เช็คแบบละเอียด
du -h /mnt/path |sort -h
du -h -x /mnt/path/* | sort -hr > chksizect03_sort.txt

2. เช็คไม่ละเอียด
du -sh /mnt/path/* |sort -h
du -sh /mnt/path/* |sort -rh > chksize.txt

3. จัดเรียงแค่ 10 ลำดับ
tree -ihafF /home | tr '[]' ' '|sort -k1hr|head -10

Ref.
linux-showing-wrong-disk-space-used-du-h-x-sort-hr-has-different-space


Thursday, July 12, 2018

ibmonitor

#gwet http://prdownloads.sourceforge.net/ibmonitor/ibmonitor-1.4.tar.gz
#tar -zvxf ibmonitor-1.4.tar.gz
# chown -R root ibmonitor
# chmod -R 755 ibmonitor
# cp -r ibmonitor /usr/bin/
# /usr/bin/ibmonitor/ibmonitor --bits --bytes --max --avg --data
#/usr/bin/ibmonitor/ibmonitor ibmonitor --max --avg --data


Ref: ibmonitor

Monday, February 26, 2018

แก้ DNS ubuntu 17.10

sudo vim /etc/resolvconf/resolv.conf.d/head
nameserver IP dns internal 1
nameserver IP dns internal 2

Sunday, February 4, 2018

configure samba for centos 7

#yum install samba samba-client samba-common


vim /etc/samb/smb.conf

-------------------------------------------Start-----------------------------------------------------
[global]
        workgroup = ARSSYSTEM
        server string = ARS Data Center System
        security = user
        netbios name = ARSDC08

        browseable = No
;       passdb backend = tdbsam
        passdb backend = smbpasswd

        printing = cups
        printcap name = cups
        load printers = no
        cups options = raw
        disable spoolss = yes
        load printers = no
        printing = bsd
        printcap name = /dev/null
        disable spoolss = yes

        veto files = /*.mp3*/            #Protect file mp3

        log file = /var/log/samba/%m.log
        log level = 3
        debug timestamp = yes
        host msdfs = no
        ntlm auth = yes                   # For user windows xp access

-------------------------------------------//End//---------------------------------------------------

การปรับสิทธิ์ให้ผู้ใช้งาน 2 กลุ่ม เช่น user01 อยู่ในกลุ่ม user, tech สามารถสร้างและให้คนที่อยู่ในกลุ่มอื่นแก้ไขไฟล์ได้พร้อมกัน โดยการบังคับให้เวลาสร้าง Folder, File, อยู่ในกลุ่ม tech แทนกลุ่ม user

[tech]
        comment = Tech department only
        inherit acls = Yes
        path = /mnt/tech
        guest ok = no
        browseable = yes
        write list = @techAdmin   #only the group that has write privileges
        valid users = @tech
        force group = tech            #this is so that all files written to the share will be set to "chgrp tech" if you dont do this only the user that created the file will have access to it.
        create mask = 0775            #this forces all created documents to have 775 perms (WR-WR-WR)
        directory mask = 0775       #same for directories