Wednesday, March 30, 2016

check host command 'nslookup' on linux

ตรวจสอบไอพีเว็บไซต์ และตรวจสอบไอพีเพื่อหาชื่อ host ด้วยคำสั่ง nslookup

1. nslookup ชื่อเว็บไซต์

nslookup www.ubuntugeek.com
Server: 127.0.1.1
Address: 127.0.1.1#53

Non-authoritative answer:
www.ubuntugeek.com canonical name = ubuntugeek.com.
Name: ubuntugeek.com
Address: 74.126.24.86

* with special DNS
nslookup ad.mydomain.com 172.16.x.xx

2. nslookup ไอพีที่ต้องกาตรวจสอบ

nslookup 74.126.24.86
Server: 127.0.1.1
Address: 127.0.1.1#53

Non-authoritative answer:
86.24.126.74.in-addr.arpa name = 74.126.24.86.static.a2webhosting.com.

Authoritative answers can be found from:
24.126.74.in-addr.arpa nameserver = ns2.a2webhosting.com.
24.126.74.in-addr.arpa nameserver = ns1.a2webhosting.com.

3. dig command 

dig www.ubuntugeek.com

; <<>> DiG 9.9.5-11ubuntu1.2-Ubuntu <<>> www.ubuntugeek.com
;; global options: +cmd
;; Got answer:
;; ->>HEADER<<- 63300="" div="" id:="" noerror="" opcode:="" query="" status:="">
;; flags: qr rd ra; QUERY: 1, ANSWER: 2, AUTHORITY: 2, ADDITIONAL: 5

;; OPT PSEUDOSECTION:
; EDNS: version: 0, flags:; udp: 4096
;; QUESTION SECTION:
;www.ubuntugeek.com. IN A

;; ANSWER SECTION:
www.ubuntugeek.com. 101 IN CNAME ubuntugeek.com.
ubuntugeek.com. 101 IN A 74.126.24.86

;; AUTHORITY SECTION:
ubuntugeek.com. 172601 IN NS rick.ns.cloudflare.com.
ubuntugeek.com. 172601 IN NS sara.ns.cloudflare.com.

;; ADDITIONAL SECTION:
rick.ns.cloudflare.com. 69808 IN A 173.245.59.139
rick.ns.cloudflare.com. 145901 IN AAAA 2400:cb00:2049:1::adf5:3b8b
sara.ns.cloudflare.com. 23875 IN A 173.245.58.144
sara.ns.cloudflare.com. 136107 IN AAAA 2400:cb00:2049:1::adf5:3a90

;; Query time: 0 msec
;; SERVER: 127.0.1.1#53(127.0.1.1)
;; WHEN: Wed Mar 30 15:57:39 ICT 2016
;; MSG SIZE  rcvd: 217

วิธีการตรวจสอบดิสก์หลังจากระบบล้ม หรือ ไฟตก (How to check/repair (fsck) filesystem after crash or power-outage)

          เมื่อเจอปัญหาลีนุกส์ฮาร์ดดิสก์มีปัญหา จากเครื่องดับ หรือไฟตก ลีนุกส์จะปรับซ่อมฮาร์ดดิสก์เอง เมื่อบู๊ตขึ้นมาใหม่

          มาดูคำสั่งที่ใช้ในการสแกนดิสก์ และซ่อมแซมดิสก์

1. ควรบู๊ตเข้า single mode
#init 1

2. umount /home partion หรือ umount partition ที่ต้องการสแกน
#umount /home
or
#umount /dev/sdxx

3.scan disk
#fsck -v -f /dev/sdxx
use -v -f check health disk
#fsck -y /dev/sdxx
use -y  auto fix error

4.scan disk spacial file system
#fsck -t ext3 /dev/sdxx
or
#fsck.ext3 /dev/sdxx


Ref:how-to-checkrepair-fsck-filesystem

linux-tools-to-monitor-disk-partition-usage


check bad sector on linux


ก่อนอื่นต้องเช็ค Disk drive บนเครื่องก่อน มีอะไรบ้าง สำหรับเครื่องที่ใช้รูปแบบดิสก์เป็น LVM ใช้คำสั่งตรวจเช็คดังนี้ check-disk-lvm-on-centos

แล้วใช้คำสั่งต่อไปนี้ ตรวจสอบฮาร์ดดิสก์

badblocks -v /dev/sda2 > bad-block


หลังจากรันคำสั่งเสร็จ ก็รายงานผลออกมาดังภาพด้านล่าง


badblocks -svn /dev/sdd
to have the hard disk controller replace bad blocks by spare blocks.

fsck /dev/sdd  > fix all drive
fsck /dev/sdd1  > fix special drivebadbl
repair disk

e2fsck -cfpv /dev/sda1
The parameters have the following meanings: “c” searches for bad blocks and adds them to the list, “f” forces a check on the file system, “p” repairs anything that can be safely repaired and “v” is verbose mode so you can see the command progress.

Ref: fix haddisk bad sector

Tuesday, March 29, 2016

script test ping

          วันนี้ไปเจอเว็บไซต์หนึ่ง เขียนวิธีทำสคริป Test ping server จึงลองเอามาเทสดู ผลคือ ok แต่จำได้ว่าแต่ก่อนเคยทำสคริปแบบนี้ไว้ ถ้าปิงไม่เจอ server มันจะ alert message เข้ามือถือเลย สคริปนั้นหายไปพร้อม ๆ กับเว็บไซต์ multiply.com

          วิธีการ
1. สร้างไฟล์ สคริปชื่อ testping.sh

แก้ไข
HOSTS="............"
EMAILID=".................."

-----------------------------------testping.sh-----------------------------------------
root@mail:~# cat testping.sh
#!/bin/bash
# add ip / hostname
HOSTS="IP or Host server"

# no ping request
COUNT=1

# email report when
SUBJECT="Ping failed"
EMAILID="email@mydomain.com"
for myHost in $HOSTS
do
  count=$(ping -c $COUNT $myHost | grep 'received' | awk -F',' '{ print $2 }' | awk '{ print $1 }')
  if [ $count -eq 0 ]; then
    # 100% failed
    echo "Host : $myHost is down (ping failed) at $(date)" | mail -s "$SUBJECT" $EMAILID
  fi
done
---------------------------------End---------------------------------------------------

2. เปลี่ยน permission
chmod u+x testping.sh

3. ตั้งเวลา crontab ให้สคริปทำงานตามเวลาที่เราต้องการ
crontab -e

ให้สคริปเช็คปิงทุก 1 ชม.
--------------------------------------------------------------------------------------
*/1 * * * * /path script/testping.sh

--------------------------------------------------------------------------------------

อ้างอิง: shell-scripts/monitoring-server-ecaoene-ping

Test ping ไปยังหลายๆ เครื่อง Server

bash-script-check-servers-availability

Monday, March 28, 2016

hack wifi

ทำตามเว็บไซต์นี้ ใช้เวลาในการจับ password (handshake) ประมาณ 25-30 นาที

learn-to-hack-wifi-password-with-ubuntu

Step

1. airmon-ng start wlan0
2. airmon-ng start wlp2s0
3. airodump-ng wlp2s0
4. wait for handshake
5. reaver -i wlp2s0 -b BSSID
example: reaver -i wlp2s0 -b 64:66:B3:14:FE:F8

* stop airmon-ng
airmon-ng stop wlp2s0


คำสั่งที่จำเป็นต้องใช้
Ref: aircrack-ng.org
1. สแกนไวเลส
wash -i wlan0 -C หรือ wash -i wlp2s0 -C

2. เมื่อจับ handshake ได้แล้วเริ่มแคร็กด้วยคำสั่งนี้ก็ได้
reaver -i wlp2s0 -b mac-addess -vv -d 0


ubuntu bandwith mornitor

ติดตั้งโปรแกรมจับ Monitor network จากเว็บไซต์

1.bandwidth-monitoring-tools-for-ubuntu-users
2.command-line-tools-to-monitor-linux-performance
3.ตรวจสอบใครใช้คำสั่งใดล่าสุด ทำอะไร

Thursday, March 24, 2016

script test login linux domain

1.สร้างไฟล์สคริป login: testlogin.sh
------------------------------------start script--------------------------------
smbclient //192.168.1.99/netlogon -Uadmin%passwordadmin -c 'ls'  > login.txt
------------------------------------End script--------------------------------
คำอธิบาย

smbclient   = command
//192.168.1.99/netlogon = ip: domain server / Path
-Uadmin%passwordadmin = User: admin, %=ใส่พาสเวิร์ดของ admin ในตัวอย่างสมมุติเป็น passwordadmin
-c 'ls' = command
> ส่งผลการทดสอบ login ไปในไฟล์ login.txt

2. สร้างไฟล์สำหรับส่งเมล sentmail.sh
---------------------------------Start script----------------------------------
mail -s "Subject test logindomain" < login.txt  groupmail1@email.com email2@email.com
---------------------------------End script-----------------------------------
คำอธิบาย

mail -s "Subject test logindomain"  = ส่งเมลด้วย subject "Subject test logindomain"
< login.txt = ดึงไฟล์ login.txt ส่งเข้าไปในเมล
email ใส่รายชื่อเมลที่เราต้องการให้สคริปส่งเมลไป

3. สร้าง crontab เพื่อให้สคริปทำงานและส่งเมลตามเวลาที่เรากำหนด
crontab -e   = สำหรับ debian
vim /etc/crontab  = สำหรับ CentOS

----------------------crontab----------------------------
00 */1 * * * root /root/folder/testlogin.sh    ->เทส login ทุก 1 ชม.
05 */1 * * * root /root/folder/sentmail.sh    -> แล้วส่งเมลทุก 1 ชม. 5 น.
*/05 * * * * sh /roo/chmod.sh                      Every 5 Minite
----------------------End crontab-----------------------

4. Error : tree connect failed: NT_STATUS_BAD_NETWORK_NAME
วิธีแก้ไข
4.1 เข้าไปเช็คไฟล์ smb.conf มีการกำหนด share file: netlogon ไว้ไหม
4.2 หากกำหนดไว้แล้วให้เช็คดูตาม Path ดัวกล่าว มีการสร้าง Folder: netlogon ไว้หรือไม่?
4.3 หากไม่พบให้ทำการสร้าง และกำหนด permission เป็น 755 ดังตัวอย่างต่อไปนี้
   
      mkdir /var/lib/samba/netlogon
      chmod 755 /var/lib/samba/netlogon
      ls -lF /var/lib/samba

4.4 ทดสอบรันสคริป testlogin.sh หรือก็อปปี้คำสั่งไปรันทดสอบบน terminal จะพบว่าเทส login ได้สำเร็จ

อ้างอิง
ubuntuforums.org

5. การ Mount domain
5.1 mkdir /medial/user/mydomain
5.2 chmode user:user /media/user/mydomain
5.3 run command

mount -t cifs //192.168.1.99/netlogon -o username=admin,password=passwordadmin /media/user/mydomain

อ้างอิง
sharadchhetri.com


Wednesday, March 23, 2016

check disk lvm on centos

การตรวจสอบ disk LVM บน CentOS
Ref. datadisk.co.uk
#pvs -v


#pvscan -v


#vgdisplay -v  ดูแบบละเอียด


#lvscan ตรวจสอบ disk active


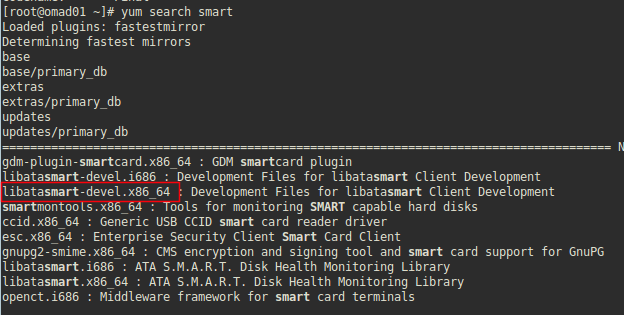
ตรวจสอบ health disk LVM ต้องติดตั้ง package smartctl ดังนี้
Ref.
 install-smart-on-centos-6-4
enterprisenetworkingplanet.com
#yum search smart


#yum install smartmontools.x86_64

ตรวจสอบ health disk ใช้คำสั่งด้านบน pvs -v เพื่อดู /dev/sd? แล้วใช้คำสั่งต่อไปนี้ ดูภาพด้านล่าง
#smartctl -H /dev/sd?


Monday, March 21, 2016

Saturday, March 19, 2016

การ Create user สำหรับใช้งาน Squid proxy

              การ Add user squid ผ่านทางหน้า web browser เป็นการอำนวยความสะดวกให้กับ admin หรือ IT support ที่ไม่มีความชำนาญในการใช้ Command line เพื่อเข้าไปจัดการกับระบบ user ใช้งานอินเตอร์เน็ต ส่วนการแอด user ด้วย command line อ่านได้จาก configure-squid3-proxy 
             สิ่งที่ต้องทำคือ ติดตั้ง webmin เพิ่มเข้า ดังนี้
1. install package libnet-ssleay-perl เพื่อใช้ ssl ดังนี้ * หากไม่ต้องการใช้ สามารถข้ามข้อนี้ไปได้เลย
#apt-get install -y libnet-ssleay-perl

2. ไปที่เว็บไซต์ http://www.webmin.com/download.html


ก็อปปี้ Link http://prdownloads.sourceforge.net/webadmin/webmin-1.791.tar.gz แล้วดาวน์โหลด

#wget http://prdownloads.sourceforge.net/webadmin/webmin-1.791.tar.gz
unzip file tar.gz
#tar zvxf http://prdownloads.sourceforge.net/webadmin/webmin-1.791.tar.gz
ติดตั้ง webmin
#sh webmin-1.791/setup.sh
Configure
- Web server port (default 10000): Enter ผ่าน
- Login name (default admin): sysadmin เปลี่ยน user login webmin
Login password: ใส่พาสเวิร์ด 2 ครั้ง
Password again:
- Use SSL (y/n): y เปิดใช้งาน ssl ซึ่งเวลาเรียกใช้งาน https://
- Start Webmin at boot time (y/n): y ให้ใช้งานได้ทุกครั้งที่เปิดเครื่อง

* หากต้องการถอด webmin ให้ใช้คำสั่ง
sh /etc/webmin/uninstall.sh

3. การเรียกใช้งานเปิด Browser แล้วพิมพ์ url: ตัวอย่าง https://proxy:10000/


ใส่ user name and password webmin


4. เมนูด้านซ้าย คลิ๊กไปที่ Server -> Squid Proxy Server


5. คลิ๊กไปที่เมนู Proxy Authentication 


6. คลิ๊ก Add a new proxy user 
7. สร้าง user สำหรับใช้งาน
8. กลับมาที่เมนูสร้าง user จะแสงรายชื่อผู้ใช้งานที่มีอยู่แล้ว และที่เราสร้างใหม่ สำหรับการเพิ่ม ลบ หรือเปลี่ยน password user จะต้องกดปุ่ม Apply Changes ที่มุมบนด้านขวาของจอ เพื่อปรับค่า configure ให้ใช้งานได้ ดูรูปด้านล่าง 

With the right ACLs, access to your proxy server can be limited to the users listed below, taken from the file /etc/squid3/passwd. After adding, deleting or changing a user you must use the Apply Changes link for the modification to take effect.


9. ปิด Browser และเปิดใหม่อีกครั้งเพื่อทดสอบ user ที่เราสร้างขึ้น ที่สำคัญอย่าลืม proxy ให้กับ Browser นั้น ๆ ด้วยนะครับ


Wednesday, March 16, 2016

การ Lock user root ไม่ให้ login หน้า Console ใน Linux

การ Lock user root ไม่ให้ login หน้า Console ใน Linux

เป็นการป้องกันระบบ Server ในอีกรูปหนึ่ง ที่เพิ่มความปลอดภัยให้มีความแข็งแกร่งมากขึ้น เมื่อคนที่ไม่เกี่ยวข้องกับระบบ เข้าถึงหน้าจอ Console แล้วใช้ user root login system ได้ อะไรจะเกิดขึ้น

การ lock user root เป็นเพียงการไม่ให้ root login ได้เท่านั้น แต่ไม่ได้ปิดสิทธิ์ต่าง ๆ ของ root หมายความว่า เราต้องกำหนดให้ user สักคน login console และ remote shell ได้ เพื่อทำหน้าที่แทน root เช่น กำหนดให้ user: A มีสิทธิ์ login console และ remote shell ได้ แล้วก็เพิ่มสิทธิ์ให้ user A ใช้ sudo, ssh, scp,sftp, เพื่อเปลี่ยนสิทธิเป็น root ได้

เท่านี้ ระบบก็มีความปลอดภัยขึ้น เพราะสามารถระบุตัวผู้ Access system ได้

1. การ lock user root ใช้คำสั่งดังนี้ (Redhad, CentOs, Debain, Ubuntu)

passwd -l root


ตรวจสอบว่า status user root ด้วยคำสั่ง passwd -S root จะแสดง status LK (Password locked) คือ user root โดน lock อยู่ดังภาพด้านล่าง


ลอง login หน้าจอ console user root ไม่สามารถ login ได้ ดูรูปด้านล่าง


Debian 

ตรวจสอบว่า status user root ด้วยคำสั่ง passwd -S root จะแสดง status L คือ user root โดน lock อยู่
ดังภาพด้านล่าง ดังภาพด้านล่าง


1. การ unlock user root ใช้คำสั่งดังนี้ (Redhad, CentOs, Debain, Ubuntu)

CentOs
passwd -u root


ตรวจสอบว่า status user root อีกครั้งด้วยคำสั่ง passwd -S root จะแสดง status PS (Password set) คือ user root ไม่ได้โดน lock อยู่ ดังภาพด้านล่างดังภาพด้านล่าง


Debian


ตรวจสอบว่า status user root ด้วยคำสั่ง passwd -S root จะแสดง status P คือ user root ไม่ได้โดน lock อยู่ ดังภาพด้านล่างดังภาพด้านล่าง


ตัวอย่าง user ที่เรากำหนดไว้ให้ login console และ remote shell สามารถใช้ sudo, ssh, scp,sftp, เพื่อเปลี่ยนสิทธิเป็น root ได้


* กรณี ต้องการให้ใช้ su ได้ ต้องลบค่า configure ที่อยู่ในไฟล์ /etc/securetty ออกให้หมด ดังนี้
cp /etc/securetty /etc/securetty.bak
vim /etc/securetty   ลบข้อมูลออกให้หมด เป็นค่าว่าง

Ref.


Remote ssh โดยกุญแจเข้ารหัส ไม่ต้องถาม password

การทำสคริป copy file ผ่าน ssh โดยกุญแจเข้ารหัส (ไม่ต้องถาม password)


วัตถุประสงค์
            ต้องการทำสคริปเพื่อก็อปปี้ไฟล์จากเครื่อง Server ไปเก็บไว้ยัง Backup Server ถ้าเราทำแบบแมนนวล เวลารันคำสคิป ก็ต้องคีย์ password ssh แต่ถ้าไม่อยากคีย์ก็ทำเป็น Text file ไว้แล้วให้สคิปไปเช็ค password กับ Text file นั้น
            การทำแบบนี้มีโอกาสโดนขโมยอ่าน password ได้ ดังนั้น จึงใช้วิธีการ Encryption password ไว้ ในรูปแบบกุญแจ 2 ลูก ลูกนึงวางไว้ที่เครื่อง Server ต้นทาง และอีกลูกนึงวางไว้ที่ Backup Server

วิธีการ
1. Key Encryption การทำกุญแจเข้ารหัสพาสเวิร์ด มีขั้นตอนดังนี้

เครื่อง Server

ใช้รูปแบบคำสั่ง ด้านล่าง
#ssh-keygen -t rsa -b 4096  ค่าปกติ 2048 bit

จะมี 2 ไฟล์  Generate ขึ้นมา ที่ /root/.ssh/ ดูภาพด้านล่าง


id_rsa
id_rsa.pub

เสร็จแล้วให้ก็อปปี้ไฟล์ id_rsa.pub ไปยังเครื่อง Backup Server ด้วยคำสั่ง
scp id_rsa.pub user@192.168.x.x:/path/backup

เครื่อง Backup Server

เข้าไปยัง path ที่เก็บไฟล์ id_rsa.pub แล้ว convert ไฟล์ไปยัง authorized_keys ที่ /root/.ssh/ ด้วยคำสั่ง
ต่อไปนี้

cp authorized_keys authorized_keys.bak ก็อปปี้ไฟล์กุญแจไว้ก่อน

cat id_rsa.pub >> /root/.ssh/authorized_keys

cat authorized_keys เพื่อดูคีย์ที่เราเพิ่มเข้าไป มีการเข้ารหัสไว้

ทดสอบใช้งาน

กลับไปที่เครื่อง Server แล้วลองก็อปปี้ไฟล์ ไปเก็บไว้ยัง Backup Server ด้วยคำสั่งเดิมอีกคร้้ง

scp test.txt user@192.168.x.x:/path/backup

วิธีการส่งคำสั่งไปรันที่เครืองรีโมทย์
ssh 192.168.10.xx "command 1 && command2"
ssh 192.168.10.xx "update && date"

จะเห็นว่าไม่มีการถาม password เหมือนตอนแรก

2. ทำสคริปเพื่อให้ก็อปปี้ไฟล์จากเครื่อง Server ไปยังเครื่อง Backup Server ดังนี้

crontab -e
ใส่สคริปให้ทำงาน เวลา 20:00 น. ของทุกวัน

0 20 * * *      scp -r /etc/postfix user@192.168.xx.xx:/pathe/backup

เรื่องที่เกี่ยวข้อง
1. คำสั่ง scp
2. Key Encryption


Tuesday, March 15, 2016

การเซท Proxy ใน Google Chrome บนเครื่อง Ubuntu 15.10 64bit

การเซท Proxy ใน Google Chrome บนเครื่อง Ubuntu 15.10 64bit


1. ใน google chrome บน Ubuntu เพิ่งรู้ว่าไม่สามารถเซทค่า proxy ได้ เมือคลิ๊กไปที่รูป 3 ขีดเรียงต่อกัน ดังรูปด้านล่าง


แล้วเลือกไปที่ Setting ดังรูปด้านล่าง


2. เลื่อนลงไปด้านล่างสุด คลิ๊ก Show advanced settings ดูรูปด้านล่าง


3. เลื่อนลงไปที่ Network แล้วเลือก Change proxy settings... ดูรูปด้านล่าง


4. ก็จะขึ้นข้อความว่า บลา ๆ สรุปความได้ว่า ไม่สามารถเปิด menu proxy setting ได้ แนะนำให้เซทผ่านทาง command line เอาละกัน


5. วิธีแก้ไข ubuntu 15.10 ให้กดปุ่มธงวินโดว์แล้วพิมพ์ network ดูรูปด้านล่าง


6. คลิ๊กไปที่เมนู Network proxy แล้วเลือกเป็น Manual เพื่อใส่ค่า proxy เสร็จแล้วกด Apply system wide ดูรูปด้านล่าง


7. Authenticate ใส่ password user ที่เรา login เข้าใช้งานหรือ password ตอนเปิดเครื่อง ubuntu


8. เสร็จแล้วเปิด Google Chrome ขึ้นมาเพื่อใช้งานอินเตอร์เน็ต ใส่ password user proxy สำหรับระบบที่มีการ Authen หรือไม่ได้เซท Authen ไว้ก็สามารถใช้อินเตอร์เน็ตได้


จบ


การเปิด service ให้ทำงานใน Linux CentOS | Ubuntu

การเปิด service ให้ทำงานใน Linux CentOS 


1. ใช้คำสั่ง chkconfig --list เพื่อตรวจสอบ service ที่เปิดให้บริการอยู่


2. ต้องการเรียกดูเฉพาะ service นั้น ๆ ได้เปิดให้บริการอยู่หรือไม่? ตัวอย่างตรวจสอบ service samba chkconfig --list smb


3. ต้องการเปิด service samba ให้ทำงานตั้งแต่เปิดเครื่อง ดังนี้
chkconfig --level 2345 smb on


หรือ
4. chkconfig service on
ตัวอย่าง

chkconfig named on
chkconfig smb on
chkconfig nmb on

5. สำหรับ Ubuntu ต้องใช้ service sysv-rc-conf แทน chkconfig โดยต้องติดตั้งเพิ่มเข้าไป ดังนี้
apt install sysv-rc-conf

การเรียกใช้ก็คล้ายกัน เช่น
sysv-rc-conf --list
sysv-rc-conf --list packet


Ref.
www.centos.org

การเปิด service ให้ทำงานใน Linux Ubuntu

ตรวจสอบรายการ Service ที่ใช้งานอยู่
#service --status-all
#service smbd status  -->for ubuntu server
ตย.


+ คือ Service ที่เปิดให้รันตั้งแต่ตอนบู๊ตระบบ
- คือ Service ที่ไม่ได้เปิดให้รันตั้งแต่ตอนบู๊ตระบบ


เพิ่ม Service ที่ต้องการเข้าไป 
#update-rc.d servicename defaults
ตย.
#update-rc.d samba defaults
ลบ Service ที่ไม่ต้องการให้รันออกไป
#update-rc.d -f servicename remove

Ref.
Add service run on startup Ubuntu


Saturday, March 12, 2016

รวมคำสั่งที่ใช้ในการ configure squid3 proxy

Command
#Install
apt-get update ; apt-get install -y squid3 apache2-utils

#configure
mv /etc/squid/squid.conf /etc/squid/squid.conf.bkp --> Backup configure
# แยกเอา comment ออกเหลือไว้เฉพาะค่าคอนนฟิก
grep -Eiv '(^#|^$)' /etc/squid/squid.conf.bkp
or
grep -ve ^# -ve ^$ /etc/squid/squid.conf.bkp > /etc/squid/squid.conf

#Authentication & create new user
touch /etc/squid3/passwd
htpasswd -c /etc/squid3/passwd user

การเช็ค user ที่เราสร้าง
#/usr/lib/squid3/ncsa_auth /etc/squid3/passwd
username password กด Enter
OK  --> Status

#Delete user
*ลบ user ในไฟล์ /etc/squid3/passwd ทิ้ง

#Rotate log file
30 0 * * *    /usr/sbin/squid3 -k rotate

1. squid3 -v = show version
2. ps aux|grep squid = check process squid
3. squid3 -z = create swap directory
4. squid 3 -k reconfigure = update configure immediately
5. service squid3 restart = restart service
6. view squid log
    6.1 tail -f /var/log/squid3/access.log
    6.2 tail -f /var/log/squid3/access.log | grep user ดูเฉพาะ user คนนี้
    6.3 tail -f /var/log/squid3/access.log | grep -oE 'http.*'

** แก้ไขปัญหา squid3 ออกเว็บไซต์ www.google.com ไม่ได้
ให้เพิ่ม dns_v4_first on เข้าไปแล้ว service squid3 restart เปิดได้แล้ว
Ref: squid3-cant-access-google-com-or-bing-com


custome squid log

ปรับแต่ง access.log ใน squid เพื่อให้แสดงวันที่ด้วย ดังนี้

Setting Maximum Download Size

Ref. linuxquestions.org


ตัวอย่าง

Old


New


Such as when an allstaff email goes out saying "check this site out..."
  • TCP_MISS/200 means that the requested document was not in the cache but it could fetch it OK from the web server. The direct at the end says that the file was fetched from the webserver.
  • TCP_IMS_HIT/304 means that the client asked if the file has changed, and squid checked its date/time on the webserver and found it had not changed, so it gave a copy of the file to the client out of its local cache.
Ref: imrgill.com
การปรับแต่ง log ให้เอาชื่อ user Authen ขึ้นมาก่อน
อันเก่าเรียง ตาม date, repornse time, ip, website, user login, ....


อันใหม่เรียง date, response time, user login, ....
ให้แก้ไขโดยนำ %un ขึ้นมาก่อน %>a
*สามารถใส่คำ เช่น user=[%un] ได้ดังรูปด้านล่าง


ตรวจสอบ log ดูภาพด้านล่าง
log formate code


Log format codes  

Field name syntax keys:
     {} modifier or argument. Also used to specify header names
     >  request (client)
     <  reply (server)
     a  address
     A  address name
     h  all headers
     i  ident
     p  port
     r  request line (no query)
     t  time
     u  user
     l  local address/port (where request was accepted)

Add caption


Squid Format
Ref. trafficserver.apache.org


1
    cqtq The client request timestamp in Squid format; the time of the client request in seconds since January 1, 1970 UTC (with millisecond resolution).
2
    ttms The time Traffic Server spent processing the client request; the number of milliseconds between the time the client established the connection with Traffic Server and the time Traffic Server sent the last byte of the response back to the client.
3
    chi The IP address of the client’s host machine.
4

    crc/pssc The cache result code; how the cache responded to the request: HIT, MISS, and so on. Cache result codes are described here.

        The proxy response status code (the HTTP response status code from

    Traffic Server to client).
5
    psql The length of the Traffic Server response to the client in bytes, including headers and content.
6
    cqhm The client request method: GET, POST, and so on.
7
    cquc The client request canonical URL; blanks and other characters that might not be parsed by log analysis tools are replaced by escape sequences. The escape sequence is a percentage sign followed by the ASCII code number of the replaced character in hex.
8
    caun The username of the authenticated client. A hyphen (-) means that no authentication was required.
9
    phr/pqsn The proxy hierarchy route; the route Traffic Server used to retrieve the object.

    The proxy request server name; the name of the server that fulfilled the request. If the request was a cache hit, then this field contains a hyphen (-).
10
    psct The proxy response content type; the object content type taken from the Traffic Server response header.

Wednesday, March 9, 2016

แก้ไปปัญหา command line path เข้าไปที่ folder ที่มีช่องว่าง

การสร้าง Folder ที่มีช่องว่าง จะทำให้มีปัญหาในระบบ Linux เวลา command line เข้าไปจัดการอะไรสักอย่าง จะเข้า Folder นั้น ๆ ไม่ได้ ซึ่งมีวิธีในการเข้าถึง folder ดังนี้

ตัวอย่างของ folder ที่มีช่องว่าง เช่น Folder: Document Center and fife sharing

Folder ดังกล่าวมีช่องว่าอยู่ด้วยกัน 4 ช่อง ซึ่งเวลาใช้ command line เข้าไปยังโฟลเดอร์ดังกล่าว(แบบด้านล่าง) จะเข้าไปแบบนี้ไม่ได้

cd Document Center and fife sharing

ต้องเข้าด้วยรูปแบบนี้ ก็อปปี้ชื่อโฟลเดอร์นั้น ๆ มาว่างก่อน แล้วค่อยใช้ \ ปิดท้ายคำทุกคำ จนถึงคำสุดท้ายให้ปิดท้ายด้วย / ตัวอย่าง

cd Document\ Center\ and\ fife\ sharing/

or

cd Document\ Center\ and\ fife\ sharing  ไม่ต้องปิดท้ายด้วย /


ตัวอย่างของ folder ที่มีช่องว่าง และวงเล็บเช่น Folder: 
Document Center and fife (sharing)     =     #cd Document\ Center\ and\ fife\ \(sharing\)


Monday, March 7, 2016

how to use testdisk


Testdisk
how to use testdisk

how to install squid proxy with Authentication

For install and configure
 --------------------การติดตั้ง-------------------------------------
ติดตั้ง squid proxy ด้วยคำสั่ง
apt-get update ; apt-get install -y squid3 apache2-utils

การแก้ไขค่าคอนฟิก โดยให้ตัดเอาเครื่องหมาย #comment ออกเหลือแต่ค่า configure อย่างเดียว ใช้คำสั่งต่อไปนี้

mv /etc/squid/squid.conf /etc/squid/squid.conf.bkp --> Backup configure

grep -Eiv '(^#|^$)' /etc/squid/squid.conf.bkp
or
grep -ve ^# -ve ^$ /etc/squid/squid.conf.bkp > /etc/squid/squid.conf

การสร้าง user สำหรับเข้าใช้งานอินเตอร์เน็ต  For debian
touch /etc/squid3/passwd
htpasswd -c /etc/squid3/passwd user
ใส่ password 2 ครั้ง

การเช็ค user ที่เราสร้าง
#/usr/lib/squid3/ncsa_auth /etc/squid3/passwd
username password กด Enter
OK  --> Status

----------------------------------------------------------------------

----------------file squid--------------------------------------
1. Authentication
2. Block website

------Start-------
# Access Control Options
#-----------------------
#
acl QUERY urlpath_regex -i cgi-bin \? \.php$ \.asp$ \.shtml$ \.cfm$ \.cfml$ \.phtml$ \.php3$ localhost
acl all src
acl localhost src 127.0.0.1/32 ::1
acl localnet src 192.168.1.0/24 # Internal network
acl to_localhost dst 127.0.0.0/8 0.0.0.0/32 ::1
acl forbidden dstdomain "/etc/squid3/block_website"
http_access deny forbidden
acl SSL_ports port 443
acl Safe_ports port 80          # http
acl Safe_ports port 21          # ftp
acl Safe_ports port 443         # https
acl Safe_ports port 70          # gopher
acl Safe_ports port 210         # wais
acl Safe_ports port 1025-65535  # unregistered ports
acl Safe_ports port 280         # http-mgmt
acl Safe_ports port 488         # gss-http
acl Safe_ports port 591         # filemaker
acl Safe_ports port 777         # multiling http
acl manager proto cache_object
acl purge method PURGE
acl CONNECT method CONNECT

#Authentication
# -------------
#
auth_param basic program /usr/lib/squid3/ncsa_auth /etc/squid3/passwd
#auth_param basic credentialsttl 30 minutes
auth_param basic credentialsttl 2 hours
auth_param basic casesensitive off
auth_param basic realm Squid proxy-caching web server for Lee Moyoon system
acl ncsa proxy_auth REQUIRED
http_access allow ncsa

#
http_access allow manager localhost
http_access deny manager
http_access allow purge localhost
http_access deny purge
http_access deny !Safe_ports
http_access deny CONNECT !SSL_ports
http_access allow localhost
http_access allow localnet
http_access deny all
#
# Network Option
# ------------
#
http_port 3128
#
# Option which affect the cache size
# ===============
#
cache_mem 8 MB
maximum_object_size_in_memory 32 KB
memory_replacement_policy heap GDSF
cache_replacement_policy heap LFUDA
cache_dir ufs /var/cache/squid 1000 16 256
maximum_object_size 100 MB
cache_swap_low 95
cache_swap_high 99
#
# Option for tuning the cache
# =====================
#
cache deny QUERY
refresh_pattern ^ftp: 1440 20% 10080 reload-into-ims
refresh_pattern ^gopher: 1440 0% 1440
refresh_pattern -i \.(gif|png|jp?g|ico|bmp|tiff?)$ 10080 95% 43200 override-expire override-lastmod reload-into-ims ignore-no-cache ignore-private
refresh_pattern -i \.(rpm|cab|deb|exe|msi|msu|zip|tar|xz|bz|bz2|lzma|gz|tgz|rar|bin|7z|doc?|xls?|ppt?|pdf|nth|psd|sis)$ 10080 90% 43200 override-expire override-lastmod reload-into-ims ignore-no-cache ignore-private
refresh_pattern -i \.(avi|iso|wav|mid|mp?|mpeg|mov|3gp|wm?|swf|flv|x-flv|axd)$ 43200 95% 432000 override-expire override-lastmod reload-into-ims ignore-no-cache ignore-private
refresh_pattern -i \.(html|htm|css|js)$ 1440 75% 40320
refresh_pattern -i \.index.(html|htm)$ 0 75% 10080
refresh_pattern -i (/cgi-bin/|\?) 0 0% 0
refresh_pattern . 1440 90% 10080
#
quick_abort_min 0 KB
quick_abort_max 0 KB
quick_abort_pct 100
store_avg_object_size 13 KB
#
# HTTP Option
# ==========
vary_ignore_expire on
#
# ANONIMITY OPTIONS
# ===============
#
request_header_access From deny all
request_header_access Server deny all
request_header_access Link deny all
request_header_access Via deny all
request_header_access X-Forwarded-For deny all
#
------End--------

สร้างไฟล์ block_website /etc/squid/block_website

root@proxy:/etc/squid3# cat block_website
.twitter.com
.pinterest.com
.cyberciti.biz


ปรับใช้งาน squid ด้วยคำสั่ง
squid3 -k reconfigure

Reference: adilmehmoodbutt
----------------------------------------------------------------------

1. tecmint.com
Base on debian
* เว็บไซต์ไทย
ireallyhost.com
* การปรับแต่ง cach
rmutsv.ac.th/blogs
* Transparent proxy
topcomputer.co.th

2. wiki.squid-cache.org
Permit some time, All day
Ext.

acl foo proxy_auth REQUIRED
acl bar proxy_auth lisa sarah frank joe
acl daytime time 08:00-17:00
http_access allow foo daytime
http_access allow bar
http_access deny all

3. switchroot.com
For create file Create a NCSA password

4.linode.com
Base on Ubuntu
Ext. command

sudo htpasswd /etc/squid3/squid_passwd user1

5.arashmilani.com
Base on CentOS 6.5
Ext. command

sudo htpasswd -d /etc/squid/squid_passwd john