วิธีการ convert server phisicall ไปใช้งานใน Vmware
convert-a-physical-linux-server-to-vmware-vm
Monday, December 18, 2017
Wednesday, December 13, 2017
Key windows 10
Windows 10 Install Key
- Windows 10 Home – YTMG3-N6DKC-DKB77-7M9GH-8HVX7
- Windows 10 Home Single Language – BT79Q-G7N6G-PGBYW-4YWX6-6F4BT
- Windows 10 Home Country Specific – N2434-X9D7W-8PF6X-8DV9T-8TYMD
- Windows 10 Education – YNMGQ-8RYV3-4PGQ3-C8XTP-7CFBY
- Windows 10 Pro – VK7JG-NPHTM-C97JM-9MPGT-3V66T
Windows 10 Product Key
TX9XD-98N7V-6WMQ6-BX7FG-H8Q99W269N-WFGWX-YVC9B-4J6C9-T83GX
MH37W-N47XK-V7XM9-C7227-GCQG9
DPH2V-TTNVB-4X9Q3-TJR4H-KHJW4
WNMTR-4C88C-JK8YV-HQ7T2-76DF9
Windows 10 Home Single Language
7HNRX-D7KGG-3K4RQ-4WPJ4-YTDFH
Windows 10 Home Country Specific (CN)
PVMJN-6DFY6-9CCP6-7BKTT-D3WVR
Windows 10 Professional Product Key
VK7JG-NPHTM-C97JM-9MPGT-3V66TW269N-WFGWX-YVC9B-4J6C9-T83GX
6P99N-YF42M-TPGBG-9VMJP-YKHCF
Windows 10 Enterprise Product Key
NPPR9-FWDCX-D2C8J-H872K-2YT43PBHCJ-Q2NYD-2PX34-T2TD6-233PK
CKFK9-QNGF2-D34FM-99QX2-8XC4K
Ref: windows-10-product-key-free-for-you-part-2
Tuesday, November 28, 2017
การเซท LDAP Address book (Thunderbird) iRed Admin
server: CentOS 7 (64bit)
สิ่งที่ต้องทำ
1. ตรวจสอบเครื่อง mail server เปิด Firewall ไว้หรือป่าว
firewall-cmd --list-all
2. Port 389 service slapd เปิดให้บริการอยู่ไหม
netstat -pnat |grep slapd
3. จากข้อที่ 1. หากมีการเปิด Firewall ไว้แล้วไม่มีการแอดพอร์ต 389 ไว้ และในข้อ 2 service จะต้องทำงานอยู่ ให้ทำการ add port: 389 ใน firewall
firewall-cmd --permanent --add-port=389/tcp
firewall-cmd --reload (save rule)
firewall-cmd --list-all (check all service/port runing)
จบ สำหรับการตรวจสอบ firewall ต่อไปเป็นการเซท LDAP Address book บน Thunderbird
1. General
* ให้ตรวจสอบ Base DN จากไฟล์ iRedMail.tips #OpenLDAP
Host name: abc.co.th / IP address
Base DN: domainName=abc.co.th,o=domains,dc=abc,dc=co,dc=th
Bind DN: mail=user@abc.co.th,ou=Users,domainName=abc.co.th,o=domains,dc=abc,dc=co,dc=th

2. Advanced
(&(enabledService=mail)(enabledService=deliver)(enabledService=displayedInGlobalAddressBook)(|(objectClass=mailList)(objectClass=mailAlias)(objectClass=mailUser)))


Ref: Thunderbird use-openldap-as-global-ldap-address-book
Ms office(2010) use.openldap.as.address.book.in.outlook
สิ่งที่ต้องทำ
1. ตรวจสอบเครื่อง mail server เปิด Firewall ไว้หรือป่าว
firewall-cmd --list-all
2. Port 389 service slapd เปิดให้บริการอยู่ไหม
netstat -pnat |grep slapd
3. จากข้อที่ 1. หากมีการเปิด Firewall ไว้แล้วไม่มีการแอดพอร์ต 389 ไว้ และในข้อ 2 service จะต้องทำงานอยู่ ให้ทำการ add port: 389 ใน firewall
firewall-cmd --permanent --add-port=389/tcp
firewall-cmd --reload (save rule)
firewall-cmd --list-all (check all service/port runing)
จบ สำหรับการตรวจสอบ firewall ต่อไปเป็นการเซท LDAP Address book บน Thunderbird
1. General
* ให้ตรวจสอบ Base DN จากไฟล์ iRedMail.tips #OpenLDAP
Host name: abc.co.th / IP address
Base DN: domainName=abc.co.th,o=domains,dc=abc,dc=co,dc=th
Bind DN: mail=user@abc.co.th,ou=Users,domainName=abc.co.th,o=domains,dc=abc,dc=co,dc=th

(&(enabledService=mail)(enabledService=deliver)(enabledService=displayedInGlobalAddressBook)(|(objectClass=mailList)(objectClass=mailAlias)(objectClass=mailUser)))

3. Test login

Ref: Thunderbird use-openldap-as-global-ldap-address-book
Ms office(2010) use.openldap.as.address.book.in.outlook
Sunday, November 19, 2017
Wednesday, November 15, 2017
Monday, October 23, 2017
set caldev calendar iredmail admin
1. For Ms outlook 2013 install plugin caldev
https://www.symplicity.com/wp-content/uploads/csm-how-to-caldav-outlook-synchronizer.pdf
configure:
https://www.webdavsystem.com/server/access/caldav/ms_outlook_caldav_synchronizer/
https://www.one.com/en/support/guide/setting-up-outlook-with-caldav-synchronizer#step-1
2. For Thunderbird install plugin caldev
https://www.zensoftware.co.uk/kb/Knowledgebase/How-to-synchronize-calendars-via-CalDAV-in-Mozilla-Thunderbird
3.
Friday, September 22, 2017
set up google drive on Ubuntu 17.04
Read on website
https://www.2daygeek.com/mount-access-google-drive-on-linux-with-google-drive-ocamlfuse-client/#
https://www.2daygeek.com/mount-access-google-drive-on-linux-with-google-drive-ocamlfuse-client/#
Saturday, September 16, 2017
migrade user samba from old server to new server
1. Transfer use
2.1 Old server
[root@old-server ~]# mkdir /root/move
[root@old-server ~]# export UGIDLIMIT=500
[root@old-server ~]# awk -v LIMIT=$UGIDLIMIT -F: '($3>=LIMIT) && ($3!=65534)' /etc/passwd > /root/move/passwd.mig
[root@old-server ~]# awk -v LIMIT=$UGIDLIMIT -F: '($3>=LIMIT) && ($3!=65534)' /etc/group > /root/move/group.mig
[root@old-server ~]# awk -v LIMIT=$UGIDLIMIT -F: '($3>=LIMIT) && ($3!=65534) {print $1}' /etc/passwd | tee - |egrep -f - /etc/shadow > /root/move/shadow.mig
2.2 copy to new server
rsync -ahrvz ssh /root/move 172.16.xx.xx:/root/move
2.3 Import user & passwd to new server (should be backup usernam&passwd before import data)
[root@new-server ~]# cd /root/move
[root@new-server ~]# cat passwd.mig >> /etc/passwd
[root@new-server ~]# cat group.mig >> /etc/group
[root@new-server ~]# cat shadow.mig >> /etc/shadow
cp gshadow.mig /etc/gshadow
สุดท้ายให้ก็อปปี้ user and passwd ในห้อง /etc/samba จากเครืองเก่าไปวางไว้ที่เครืองใหม่
/etc/samba
smbpasswd
smbusers
* for Centos v7
ให้ก็อปปี้เฉพาะไฟล์ smbpasswd ไปไว้ที่ Folder นี้
/var/lib/samba/private/
Ref:
1. migrating-samba-server-and-users-in.html
2. howto-move-migrate-user-accounts-old-to-new-server/
3. http://amar-linux.blogspot.com/2012/03/migrating-samba-server-and-users-in.html
- /etc/passwd
- /etc/group
- /etc/shadow
- home directories and shared directories
- /etc/samba
- /var/lib/samba
2.1 Old server
[root@old-server ~]# mkdir /root/move
[root@old-server ~]# export UGIDLIMIT=500
[root@old-server ~]# awk -v LIMIT=$UGIDLIMIT -F: '($3>=LIMIT) && ($3!=65534)' /etc/passwd > /root/move/passwd.mig
[root@old-server ~]# awk -v LIMIT=$UGIDLIMIT -F: '($3>=LIMIT) && ($3!=65534)' /etc/group > /root/move/group.mig
[root@old-server ~]# awk -v LIMIT=$UGIDLIMIT -F: '($3>=LIMIT) && ($3!=65534) {print $1}' /etc/passwd | tee - |egrep -f - /etc/shadow > /root/move/shadow.mig
cp /etc/gshadow /root/move/gshadow.mig2.2 copy to new server
rsync -ahrvz ssh /root/move 172.16.xx.xx:/root/move
OR
tar -czvf move.tar.gz move
scp move.tar.gz root@172.16.xx.xxx:/root
tar -czvf move.tar.gz move
scp move.tar.gz root@172.16.xx.xxx:/root
2.3 Import user & passwd to new server (should be backup usernam&passwd before import data)
[root@new-server ~]# cd /root/move
[root@new-server ~]# cat passwd.mig >> /etc/passwd
[root@new-server ~]# cat group.mig >> /etc/group
[root@new-server ~]# cat shadow.mig >> /etc/shadow
cp gshadow.mig /etc/gshadow
สุดท้ายให้ก็อปปี้ user and passwd ในห้อง /etc/samba จากเครืองเก่าไปวางไว้ที่เครืองใหม่
/etc/samba
smbpasswd
smbusers
* for Centos v7
ให้ก็อปปี้เฉพาะไฟล์ smbpasswd ไปไว้ที่ Folder นี้
/var/lib/samba/private/
Ref:
1. migrating-samba-server-and-users-in.html
2. howto-move-migrate-user-accounts-old-to-new-server/
3. http://amar-linux.blogspot.com/2012/03/migrating-samba-server-and-users-in.html
Wednesday, September 6, 2017
Tuesday, September 5, 2017
Wireshark
ใช้ Wireshark hack password email
1. Run wireshark : sudo wireshark
2. ใช้คีย์เวิร์ดในการค้นหาข้อมูล : secretkey ดูข้อมูลด้านล่าง
3. Keyword แต่ละเมล เซิร์ฟเวอร์ไม่เหมือนกัน ตย. _pass, _user

1. Run wireshark : sudo wireshark
2. ใช้คีย์เวิร์ดในการค้นหาข้อมูล : secretkey ดูข้อมูลด้านล่าง
3. Keyword แต่ละเมล เซิร์ฟเวอร์ไม่เหมือนกัน ตย. _pass, _user

Thursday, August 24, 2017
Can not use LAN after upgrad Ubunu 16.04 to 17.04
Edit file /usr/lib/NetworkManager/conf.d/10-globally-managed-devices.conf
keyfile]
unmanaged-devices=*,except:type:wifi,except:type:wwan
To
[keyfile]
unmanaged-devices=*,except:type:ethernet,except:type:wifi,except:type:wwan
sudo service network-manager restart
Ref:ethernet-adapter-was-disable-on-ubuntu-17-04Sunday, August 20, 2017
Places & Files indicator
Install Places on top linux desktop
sudo add-apt-repository ppa:vlijm/placesfiles
sudo apt-get update
sudo apt-get install placesfiles
Ref: places-indicator-menu-ubuntu-system-tray
Thursday, August 10, 2017
Disable selinux on Centos 7 and set firewall-cmd
CentOS7
1.check status selinux enable or disable
#sestatus
#vim /etc/sysconfig/selinux
SELINUX=disabled
and Reboot system
ถ้าปิด Selinux ผิดจะขึ้น Error แบบนี้ : failed to load selinux policy freezing
วิธีแก้ไข
ในหน้าบู๊ด ให้กด e แล้วมองหา linux16 แล้วเพิ่ม selinux=0 เข้าไป แล้ว ctrl+x เพื่อเข้าสู่ระบบ จากนั้นไปแก้ไขค่า
SELINUX=disabled ตามข้อมูลด้านบน
Go to the main command (usually starting with “linux16” or something similar) and add “selinux=0” as one of the parameters:
Ref: selinux policy freezing
Ref: disable-selinux-temporarily-permanently-in-centos-rhel-fedora/
2. Enable / Disable service
- SAMBA
systemctl enable smb.service
systemctl enable nmb.service
systemctl restart smb.service
systemctl restart nmb.service
Restatr/Reload service
systemctl reload smb.service
systemctl restart smb.service
Check service runnig
systemctl list-unit-fileschkconfig --list |grep ชื่อของ servicesystemctl
systemctl | more
systemctl | grep httpd
systemctl list-units --type servicesystemctl list-units --type service |grep ชื่อของ service
systemctl list-units --type mount example:
systemctl | grep smartd
View service running
systemd-cgtop - IPTABLES
systemctl stop firewalld
systemctl mask firewalld
yum install iptables-services
systemctl enable iptables
systemctl start iptablesmkdir
service iptables save
- iptables command
-A RH-Firewall-1-INPUT -p udp -m udp --dport 137 -j ACCEPT
-A RH-Firewall-1-INPUT -p udp -m udp --dport 138 -j ACCEPT-A RH-Firewall-1-INPUT -m state --state NEW -m tcp -p tcp --dport 139 -j ACCEPT-A RH-Firewall-1-INPUT -m state --state NEW -m tcp -p tcp --dport 445 -j ACCEPT
Check filrewall running ?
firewall-cmd --state systemctl status firewalldSet firewalld
List service on zone public
List only port
firewall-cmd --list-ports
Add service
Remove service
Add Port
firewall-cmd --zone=public --permanent --add-port=10000/tcp
firewall-cmd --zone=public --permanent --add-port=2500-2600/tcp
Delete port
firewall-cmd --remove-port=6161/tcp
firewall-cmd --zone=public --permanent --remove-port=10000/tcp
firewall-cmd --zone=public --permanent --remove-port=2500-2600/tcp
Save firewall
firewall-cmd --runtime-to-permanent
firewall-cmd --reloadfirewall-cmd --get-services Ref: https://www.centos.org/forums/viewtopic.php?t=61108
Ref: quick-docs firewalld
Ref: firewall-cmd config
Wednesday, August 2, 2017
List of dangerous shell commands
1. rm -rf /
2. :(){ :|: & };:
3. mkfs /dev/sda1
4. cat /dev/zero > /dev/sda1
5. wget url -O - | sh --
6. curl url | sh
7. dd if=/dev/zero of=/dev/sda2
8. echo 726d202d7266202a | xxd -r -p
9. dd if=/dev/random of=/dev/port
10. echo 1 > /proc/sys/kernel/panic
11. cat /dev/port or cat /dev/mem
12. cat /dev/zero > /dev/mem
13. sudo chmod -r 444 / or sudo chown -r nobody:nobody /
14. last | reboot
Tuesday, June 27, 2017


Monday, June 26, 2017
เปิด Vim หลายหน้าจอ
#vim -p file01.txt file02.conf
สลับแต่ละหน้าด้วย :bn (next page), :bp (previous page)
Ref: open-multiple-files-using-single-vim-editor-command-linux
สลับแต่ละหน้าด้วย :bn (next page), :bp (previous page)
Ref: open-multiple-files-using-single-vim-editor-command-linux
Tuesday, June 13, 2017
check mainboad,VGA,Network (LAN) Vmware, Linux
Check mainboad:
smbiosDump | egrep '(Product|Serial:)'
yum install dmidecode
dmidecode -t system
Check VGA:
lspci
lspci | grep Display
Check Network (LAN):
esxcli network ip interface list
esxcli network ip interface ipv4 get
esxcfg-nics -l
Network: https://www.tunnelsup.com/networking-commands-for-the-vmware-esxi-host-command-line/
Mainboad/VGA: https://serverfault.com/questions/313843/how-to-find-out-more-hardware-details-using-only-esxi4-1-and-possibly-shell
Check Network (LAN) on Centos:
lspci | egrep -i --color 'network|ethernet'
lshw -class network
*-network
description: Ethernet interface
product: RTL8169 PCI Gigabit Ethernet Controller
vendor: Realtek Semiconductor Co., Ltd.
physical id: 0
bus info: pci@0000:07:00.0
logical name: enp7s0
version: 10
serial: cc:5d:4e:38:94:60
size: 100Mbit/s
capacity: 1Gbit/s
width: 32 bits
clock: 66MHz
capabilities: pm bus_master cap_list rom ethernet physical tp mii 10bt 10bt-fd 100bt 100bt-fd 1000bt 1000bt-fd autonegotiation
configuration: autonegotiation=on broadcast=yes driver=r8169 driverversion=2.3LK-NAPI duplex=full ip=172.16.0.134 latency=64 link=yes maxlatency=64 mingnt=32 multicast=yes port=MII speed=100Mbit/s
resources: irq:19 ioport:c000(size=256) memory:fe420000-fe4200ff memory:fe400000-fe41ffff
smbiosDump | egrep '(Product|Serial:)'
yum install dmidecode
dmidecode -t system
dmidecode -t 1|grep -E '(Product Name|Manufacturer)'Check VGA:
lspci
lspci | grep Display
Check Network (LAN):
esxcli network ip interface list
esxcli network ip interface ipv4 get
esxcfg-nics -l
Network: https://www.tunnelsup.com/networking-commands-for-the-vmware-esxi-host-command-line/
Mainboad/VGA: https://serverfault.com/questions/313843/how-to-find-out-more-hardware-details-using-only-esxi4-1-and-possibly-shell
Check Network (LAN) on Centos:
lspci | egrep -i --color 'network|ethernet'
lshw -class network
*-network
description: Ethernet interface
product: RTL8169 PCI Gigabit Ethernet Controller
vendor: Realtek Semiconductor Co., Ltd.
physical id: 0
bus info: pci@0000:07:00.0
logical name: enp7s0
version: 10
serial: cc:5d:4e:38:94:60
size: 100Mbit/s
capacity: 1Gbit/s
width: 32 bits
clock: 66MHz
capabilities: pm bus_master cap_list rom ethernet physical tp mii 10bt 10bt-fd 100bt 100bt-fd 1000bt 1000bt-fd autonegotiation
configuration: autonegotiation=on broadcast=yes driver=r8169 driverversion=2.3LK-NAPI duplex=full ip=172.16.0.134 latency=64 link=yes maxlatency=64 mingnt=32 multicast=yes port=MII speed=100Mbit/s
resources: irq:19 ioport:c000(size=256) memory:fe420000-fe4200ff memory:fe400000-fe41ffff
Thursday, June 8, 2017
Create shutdown button on left menu on ubuntu
1. vim ~/.local/share/applications/shutdown.desktop
2. Insert text
[Desktop Entry]
Categories=Application;System;
Comment=To shutdown the computer
Encoding=UTF-8
Exec=gnome-session-quit --power-off
Icon=system-shutdown
Name=Shutdown-Button
NoDisplay=false
StartupNotify=false
Terminal=false
Type=Application
3. save
4. type shutdown and drage to menu


2. Insert text
[Desktop Entry]
Categories=Application;System;
Comment=To shutdown the computer
Encoding=UTF-8
Exec=gnome-session-quit --power-off
Icon=system-shutdown
Name=Shutdown-Button
NoDisplay=false
StartupNotify=false
Terminal=false
Type=Application
3. save
4. type shutdown and drage to menu

Wednesday, June 7, 2017
scan network, mac address
--------------Network----------------------------
iftop
sudo iftop -i wlp2s0
nmon
bmon -a
sudo iptraf
sudo jnettop
sudo nethogs
sudo nload -t 200 -i 1024 -o 128 -U M
nmcli c s
ip a
-----------------scan network-------------------
sudo apt install netdiscover nbtscan arp-scan
sudo netdiscover -r 10.10.254.0/24 -i wlp2s0
sudo nbtscan 172.16.106.1-172.16.106.255
sudo arp-scan -l
arp
arp -an
-----------------Check disk------------------------
fdisk -l
df -hT
lsblk -f
sudo iostat -tmx 5
-t =display time
-m =Mb
-x =extend disk I/O
5 = disply 5 second
sudo iotop
lsof or lsof |grep remmina
ref : iostat
Ref: list-all-mac-addresses-and-their-associated-ip-addresses-in-my-local-network-la
Sunday, June 4, 2017
How to protect samba from WannaCry (Sambacry)
1. Allow & Block Network
server min protocol = SMB2_10
client max protocol = SMB3
client min protocol = SMB2_10
sudo systemctl restart smbd
Ref:
http://www.techrepublic.com/article/how-to-protect-samba-from-the-likes-of-the-sambacry-exploit
hosts deny = ALL hosts allow = 192.168.1.
2. Add buttom line
server min protocol = SMB2_10
client max protocol = SMB3
client min protocol = SMB2_10
sudo systemctl restart smbd
Ref:
http://www.techrepublic.com/article/how-to-protect-samba-from-the-likes-of-the-sambacry-exploit
Sunday, May 28, 2017
set desktop remote on ubuntu for VNC from windows
1. call desktop sharing

2. sudo apt install dconf-editor
3. sudo dconf-editor
4. org -> gnome -> desktop -> remote-access unclick require-encryption
Restart server

5. VNC to server
Ref:
remote-access-ubuntu-16-04

2. sudo apt install dconf-editor
3. sudo dconf-editor
4. org -> gnome -> desktop -> remote-access unclick require-encryption
Restart server

5. VNC to server
Ref:
remote-access-ubuntu-16-04
Wednesday, April 26, 2017
ss / netstata command
ss -s
ss -lp
ss -pl | grep port no.
time netstat -at
time ss -atr
linux-investigate-sockets-network-connections
ss -lp
ss -pl | grep port no.
time netstat -at
time ss -atr
linux-investigate-sockets-network-connections
Monday, April 24, 2017
Why does my email have {disarmed} in the subject?
This is part of our virus and content scanning to protect you from malicious emails.
Whenever you see {disarmed} it means that a web bug or tracking code was found in an HTML e-mail and has been removed or "disarmed". That is to say code that would have sent info back to a remote server without your knowledge or consent. These are most often found in HTML marketing e-mails and SPAM to track when users open and read their e-mails. The disarmed tag means that the the tracking code was removed but other than that the e-mail is unchanged and will look normal.
นี่เป็นส่วนหนึ่งของการสแกนไวรัสและเนื้อหาเพื่อป้องกันคุณจากอีเมลที่เป็น อันตรายเมื่อใดก็ตามที่คุณเห็น {disarmed} หมายความว่ามีปัญหาในเว็บหรือโค้ดติดตามในอีเมล HTML และถูกนำออกหรือ "ปลดอาวุธ" กล่าวคือรหัสที่จะส่งข้อมูลกลับไปยังเซิร์ฟเวอร์ระยะไกลโดยปราศจากความรู้ หรือยินยอมของคุณ เหล่านี้มักพบในอีเมลการตลาด HTML และ SPAM เพื่อติดตามเมื่อผู้ใช้เปิดและอ่านอีเมลของตน แท็กปลดอุดหมายความว่าโค้ดติดตามถูกนำออก แต่ไม่ใช่อีเมลที่ไม่มีการเปลี่ยนแปลงและจะดูเป็นปกติ
Ref:
Why-does-my-email-have-disarmed-in-the-subject.html
Friday, March 31, 2017
configure iRedadmin
Read on install iredmail on debian ubuntu
1. แก้ไข Time/Zone SOGo
#chmod +w /etc/sogo/sogo.conf
#vim /etc/sogo/sogo.conf
SOGoTimeZone = "Asia/Bangkok";
#chmod -w /etc/sogo/sogo.conf
2. configure SSL
Installing TLS Certificate in Postfix and Dovecot
Ref: topic 8813-iredmail-support-timezone
Wednesday, March 15, 2017
check ram
1. Check RAM
2. Command
#dmidecode -t 17
Ref: 5-commands-check-memory-usage-linux
3. Check size ram
free -h --mega
(update railtime) watch -n 1 free -h --mega
cd /tmp
$  wget http://liquidtelecom.dl.sourceforge.net/project/memconf/V3.08/memconf-v3.08.pl.gz
$ gunzip memconf-v3.08.pl.gz
# perl memconf-v3.08.pl -v
whatis-maximum-ram-supported-by-linux-server-computer-system2. Command
#dmidecode -t 17
Ref: 5-commands-check-memory-usage-linux
3. Check size ram
free -h --mega
(update railtime) watch -n 1 free -h --mega
Saturday, March 11, 2017
upgrade nagios version 4.2.0-4.3.1
1. Downlaod file nagios 4.3.1
wget https://fossies.org/linux/misc/nagios-4.3.1.tar.gz
2. Backup old version
service apache2 stop && service nagios stop
#mkdir /tmp/nagios_backup
#tar -cvvzf /tmp/nagios_backup/nagios_bpk.tar /usr/local/nagios
3. go to path nagios 4.3.1 and unzip file
tar -xzf nagios-4.3.1.tar.gz
cd /root/nagios-4.3.1/
./configure --with-command-group=nagcmd
make all
make install
4. check configure
/usr/local/nagios/bin/nagios -v /usr/local/nagios/etc/nagios.cfg
Checking objects...
Checked 13 services.
Checked 2 hosts.
Checked 1 host groups.
Checked 0 service groups.
Checked 1 contacts.
Checked 1 contact groups.
Checked 24 commands.
Checked 5 time periods.
Checked 0 host escalations.
Checked 0 service escalations.
Checking for circular paths...
Checked 2 hosts
Checked 0 service dependencies
Checked 0 host dependencies
Checked 5 timeperiods
Checking global event handlers...
Checking obsessive compulsive processor commands...
Checking misc settings...
Total Warnings: 0
Total Errors: 0
5. Restart service apache2, nagios
service apache2 start && service nagios start
6. login to test ing
7. If u want to use backup reading restore
ติดตั้ง Nagios Monitor
1. Install from ubuntu-nagios/#adding-a-host-to-monitor
2. แก้ไขปัญหา การตรวจสอบ service ssh ที่เปลี่ยนพอร์ตจาก 22 เป็น พอร์ตอื่น ให้แก้ไขค่า คอนฟิกดังนี้
#vim /usr/local/nagios/etc/servers/mail.cfg
define service {
host_name mail.nanyangtest.com
service_description Check SSH
check_command check_ssh! -p 00001 แก้ไขแบบนี้
max_check_attempts 2
check_interval 2
retry_interval 2
check_period 24x7
check_freshness 1
contact_groups admins
notification_interval 2
notification_period 24x7
notifications_enabled 1
register 1
Restart service Server
#service apache2 restart && service nagios restart
Restart service another server
$sudo /etc/init.d/nagios-nrpe-server restart
Friday, March 10, 2017
set up monitor system resource user on ubuntu
sudo add-apt-repository ppa:indicator-multiload/stable-daily
sudo apt-get update
sudo apt-get install indicator-multiload
Ref: easily-monitor-system-resource-usage-linux
Monday, March 6, 2017
downgrade php 7.1 to php 5.6
แก้ไขการอัพเกรดอูบันตูจาก 15.10 - 16.04 แล้วใช้ php v.7.0 ไม่สามารถ connect data base แบบนี้ mysql_connect ได้ เพราะใน php v.7.0 up เรียกแบบ mysqli_connect()
จะต้อง Downgrade php กลับมาใช้ php5.6 โดยยังคง php7 ไว้แต่ต้องปิดการทำงานไป ดังนี้
1.Install php5.6
Ref: how-can-i-downgrade-from-php-7-to-php-5-6-on-ubuntu-16-04
จะต้อง Downgrade php กลับมาใช้ php5.6 โดยยังคง php7 ไว้แต่ต้องปิดการทำงานไป ดังนี้
1.Install php5.6
sudo add-apt-repository ppa:ondrej/php
sudo apt-get update
sudo apt-get install php7.0 php5.6 php5.6-mysql php-gettext php5.6-mbstring php-mbstring php7.0-mbstring php-xdebug libapache2-mod-php5.6 libapache2-mod-php7.0
2. disable php7 and enable php5.6sudo a2dismod php7.0 ; sudo a2enmod php5.6 ; sudo service apache2 restart
3. update service php5.6sudo update-alternatives --set php /usr/bin/php5.6Ref: how-can-i-downgrade-from-php-7-to-php-5-6-on-ubuntu-16-04
Sunday, February 26, 2017
ทดสอบปริ้น dos windows 98
การแก้ไขให้ปริ้น express dos
1: แก้ไฟล์ config.nt ใน system32 สำหรับ 98 ก็พิมพ์ sysedit ที่ Run และแก้ไข config.sys จากนั้นก็
รีสตาร์ท
2: config.nt สำหรับ Windows xpอยู่ที่ c:\windows\system32\ เพิ่มค่าตรงบรรทัดเกือบสุดท้าบครับที่เขียนว่า files = 40 แก้เป็น files=90
3: start -- > run -- > cmd -- > net print \\computername\file
4: net use lpt1: \\xx.xx.xx.xx(หมายเลขไอพีเครื่องที่แชร์เครื่องพิมพ์)\ชื่อเครื่องพิมพ์ที่แชร์
ก็จะพิมพ์ผ่าน dos ได้ครับ
5: ทดสอบพริ้นไทยใน Dos
echo test ภาษาไทย > LPT3:
6: ตรวจสอบระบบการต่อเชื่อมมระหว่างเครื่องพิมพ์กับคอมพิวเตอร์ โดยมีขั้นตอน ดังนี้
6.1 เปิดเครื่องพิมพ์และคอมพิวเตอร์ตามปกติ ป้อนกระดาษเตรียมไว้ท เครื่องพิมพ์
6.2 ให้ทดสอบเครื่องพิมพ์ที่ดอสโหมด (เฉพาะการเชื่อมต่อทางพอร์ต LPT เท่านั้น ) ซี่งจะออกมาที่
C: Prompt ของ DOS และให้พิมพ์คําสั่ง
C:\> DIR >PRN (Enter)
C:\ ให้ใช้คำสั่ง DIR >PRN หรือ DIR >LPT1
c:\print test.txt >lpt1
หากเครื่องพิมพ์สามารถพิมพ์งานได้ตามปกติ แสดงว่าระบบการต่อเชื่อมเครื่องพิมพ์ /
สายเคเบิล / LPT Port ของคอมพิวเตอร์เป็นปกติ ให้ตรวจสอบไวรัสในระบบ Windows ที่ใช้งานหรือไดรเวอร์ เครื่องพิมพ์ที่กำหนดในโปรแกรมว่าใช้ Driver EPSON LQ Series หรือไม่ ดูรายละเอียดการ
ติดตั้งไดรเวอร์ได้จากบทที่ 2 (กลับเข้าสู่ Windows โดยพิมพ์ คําว่า Exit)
หากพิมพ์จากดอสโหมดแล้วพบข้อความผิดพลาด There was an error writing to LPT 1..... และเครื่องพิมพ์ไม่ สามารถพิมพ์งานได้ แสดงว่าน่าจะเกิดปัญหากับการต่อเชื่อมระหว่างเครืองคอมพิวเตอร์กับเครื่องพิมพ์ ให้ทดสอบโดยการนําสาย Parallel เส้นใหม่มาลองเปลี่ยนดู หากยังคงพบปัญหาว่าเครื่องพิมพ์ไม่สามารถพิมพ์งานได้ กรุณาติดต่อศูนย์บริการ EPSON ทั่วประเทศ
1: แก้ไฟล์ config.nt ใน system32 สำหรับ 98 ก็พิมพ์ sysedit ที่ Run และแก้ไข config.sys จากนั้นก็
รีสตาร์ท
2: config.nt สำหรับ Windows xpอยู่ที่ c:\windows\system32\ เพิ่มค่าตรงบรรทัดเกือบสุดท้าบครับที่เขียนว่า files = 40 แก้เป็น files=90
3: start -- > run -- > cmd -- > net print \\computername\file
4: net use lpt1: \\xx.xx.xx.xx(หมายเลขไอพีเครื่องที่แชร์เครื่องพิมพ์)\ชื่อเครื่องพิมพ์ที่แชร์
ก็จะพิมพ์ผ่าน dos ได้ครับ
5: ทดสอบพริ้นไทยใน Dos
echo test ภาษาไทย > LPT3:
6: ตรวจสอบระบบการต่อเชื่อมมระหว่างเครื่องพิมพ์กับคอมพิวเตอร์ โดยมีขั้นตอน ดังนี้
6.1 เปิดเครื่องพิมพ์และคอมพิวเตอร์ตามปกติ ป้อนกระดาษเตรียมไว้ท เครื่องพิมพ์
6.2 ให้ทดสอบเครื่องพิมพ์ที่ดอสโหมด (เฉพาะการเชื่อมต่อทางพอร์ต LPT เท่านั้น ) ซี่งจะออกมาที่
C: Prompt ของ DOS และให้พิมพ์คําสั่ง
C:\> DIR >PRN (Enter)
C:\ ให้ใช้คำสั่ง DIR >PRN หรือ DIR >LPT1
c:\print test.txt >lpt1
หากเครื่องพิมพ์สามารถพิมพ์งานได้ตามปกติ แสดงว่าระบบการต่อเชื่อมเครื่องพิมพ์ /
สายเคเบิล / LPT Port ของคอมพิวเตอร์เป็นปกติ ให้ตรวจสอบไวรัสในระบบ Windows ที่ใช้งานหรือไดรเวอร์ เครื่องพิมพ์ที่กำหนดในโปรแกรมว่าใช้ Driver EPSON LQ Series หรือไม่ ดูรายละเอียดการ
ติดตั้งไดรเวอร์ได้จากบทที่ 2 (กลับเข้าสู่ Windows โดยพิมพ์ คําว่า Exit)
Friday, February 24, 2017
Install Simple Screen Recorder in Ubuntu 12.04 & Up
sudo add-apt-repository ppa:maarten-baert/simplescreenrecorder
sudo apt-get update && sudo apt-get install simplescreenrecorder
Ref:
simple-screen-recorder-linux
net work command
1.nmcli
# nmcli dev status
DEVICE TYPE STATE CONNECTION
virbr0 bridge connected virbr0
tun0 tun connected tun0
wlp2s0 wifi connected soju
enp1s0 ethernet unavailable --
lo loopback unmanaged --
virbr0-nic tap unmanaged --
#nmcli con show or
#nmcli c s
#ip a
NAME UUID TYPE DEVICE
A 66add4bf-d621-4e06-a462-f5552012e60d vpn --
Germany-Darmstadt d81ac3a2-1933-4f0e-b4d3-3353c5a93811 vpn --
B 5c80d51e-69ed-4352-a970-3990e872919c vpn --
Ais Fibre 432558f5-0a6b-4b2c-844d-c47e088735d4 802-11-wireless --
Net Mobile b32f2e69-3b7b-4393-bbe3-8be11ec9d021 802-3-ethernet --
AiS FTTH c55bbcb0-dee3-42bf-84ad-d1bb4da53e62 802-11-wireless --
@NYK e78ca4b0-a2de-43a5-a402-89eac0ccf40e 802-3-ethernet --
Customer 364694a8-641b-4ea4-b117-5406c92e173c 802-11-wireless --
C c46e5d01-7cae-4042-8906-78ed4f593c51 802-11-wireless --
virbr0 5db0c606-007f-4b4f-b9e1-fc1ec10d5979 bridge virbr0
Check speed network card
#ethtool enp4s6(network card)
#ethtool enp4s6(network card) |grep Speed
#ethtool enp4s6(network card) |grep -i speed
#mii-tools enp4s6(network card)
#dmesg |grep enp4s6(network card)
#dmesg |grep -i duplex
Ref:
configure-network-connections-using-nmcli-tool-in-linux
2. Check all Interface Network status
Ref:
how-to-detect-whether-a-physical-cable-is-connected-to-network-card-slot-on-linux
3. vnstat for monitor network traffic
yum install vnstat
vnstat -i network interface
Ref: fedora-linux-install-vnstat-network-traffic-monitor
4.
2. Check all Interface Network status
#for i in $( ls /sys/class/net ); do echo -n $i; ethtool $i | grep Link\ d; done
Ref:
how-to-detect-whether-a-physical-cable-is-connected-to-network-card-slot-on-linux
3. vnstat for monitor network traffic
yum install vnstat
vnstat -i network interface
Ref: fedora-linux-install-vnstat-network-traffic-monitor
4.
Thursday, February 23, 2017
sudo apt-get update Error 404 Not Found / remove ppa
$sudo apt-get update
Err http://ppa.launchpad.net wily/main amd64 Packages
404 Not Found

how to fix
sudo add-apt-repository --remove ppa:upubuntu-com/ppa

Ref:
failed-to-fetch-binary-i386-and-amd64-packages
Err http://ppa.launchpad.net wily/main amd64 Packages
404 Not Found
how to fix
sudo add-apt-repository --remove ppa:upubuntu-com/ppa
Ref:
failed-to-fetch-binary-i386-and-amd64-packages
Install wireshark on ubuntu
------------ On Debian/Ubuntu based Distros ------------
$ sudo apt-get install wireshark
------------ On CentOS/RHEL based Distros ------------
$ sudo yum install wireshark
------------ On Fedora 22+ Releases ------------
$ sudo dnf install wireshark
Ref:
wireshark-network-traffic-analyzer-for-linux
Stacer ubuntu system optimizer
--------------- On Ubuntu 64-bit ---------------
$ wget https://github.com/oguzhaninan/Stacer/releases/download/v1.0.4/Stacer_1.0.4_amd64.deb
$ sudo dpkg --install Stacer_1.0.4_amd64.deb
$ Stacer
Ref:stacer-ubuntu-system-optimizer
Tuesday, February 21, 2017
Recovery file with foremost
$sudo apt install foremost
$sudo foremost -t jpg -i /home/user/Pictures -o /home/user/Downloads/scan
-t file type
-i search on Path
-o keep on Path
Ref.
recover-deleted-file-in-linux
$sudo foremost -t jpg -i /home/user/Pictures -o /home/user/Downloads/scan
-t file type
-i search on Path
-o keep on Path
Ref.
recover-deleted-file-in-linux
Sunday, February 12, 2017
Tuesday, February 7, 2017
การใช้คำสั่ง cut และ grep ในการค้นหาข้อมูล
1. คำสั่ง cut
cut -d":" -f 1 /etc/passwd
root
daemon
bin
sys
sync
games
cut -d":" -f 1,7 /etc/passwd
root:/bin/bash
daemon:/bin/sh
bin:/bin/sh
sys:/bin/sh
sync:/bin/sync
games:/bin/sh
อ่านเพิ่มเติม
command cut
2. คำสั่ง grep
2.1 grep -n แสดงบรรทัดของสิ่งที่ค้นหา เช่น
#grep -n root passwd
1:root:x:0:0:root:/root:/bin/bash
12:operator:x:11:0:operator:/root:/sbin/nologin
2.2 grep -v ไม่แสดงบรรทัดที่มีคำไม่ต้องการ เช่น ไม่แสดงคำว่า root
#grep -v root /etc/passwd
2.3 grep -E ให้หาคำที่ขึ้นต้นด้วยอะไรสักอย่าง เช่น
#grep -E ^s /etc/passwd
^ใส่ก่อนตัวอักษรหรือตัวเลข ตัวแรก
อ่านเพิ่มเติม
using grep find pattern in file
** กรณีศึกษา **
ตัวอย่างการนับจำนวน user samba
1. ต้องรู้ว่า number ของ user group เช่น group: usershare = 1000 เช็คได้จาก /etc/group
2. ใช้คำสั่งต่อไปนี้
grep -n 1000 /etc/passwd > user01.txt
cut -d":" -f 2 user01.txt > user02.txt
แล้วจะได้รายชื่อ samba ที่อยู่ในกลุ่ม usershare
ปรับให้เฉพาะ user log FTP (Proftp)
Install Proftp
install-setup-proftpd-debian-9-stretch
* หลังจากเซท TLS ให้ แก้ไขไฟล์ /etc/proftpd/proftpd.conf เพื่อให้โหลดไฟล์ tls.conf ขึ้นมาทำงาน
Include /etc/proftpd/tls.conf
ติดตั้ง Firewalld เพิ่ม
apt install firewalld
เพิ่ม Rul firewall
firewall-cmd --zone=public --permanent --add-service=ftp
firewall-cmd --zone=public --permanent --add-port=6000-6100/tcp
* ปรับไฟล์ /etc/proftpd/proftpd.conf เพื่อเปิด PassivePorts ให้ Login FTP ผ่าน FileZilla ได้
Ref: proftpd
---------------------------------------------------------------------------------------------------------
ปรับเพิ่มเติมให้เฉพาะ user สามารถ log in FTP ได้ บาง user ไม่ให้เข้าใช้งาน FTP
ปรับแก้ไฟล์ /etc/passwd เช่น
www-data:x:33:33:www-data:/var/www:/usr/sbin/nologin
แก้ไขเป็น
www-data:x:33:33:www-data:/var/www:/usr/bin/false
-----------------------------------------------------------------------------------------------------------
Install quota on Debian 9
how-to-set-filesystem-quotas-on-debian-9
install-setup-proftpd-debian-9-stretch
* หลังจากเซท TLS ให้ แก้ไขไฟล์ /etc/proftpd/proftpd.conf เพื่อให้โหลดไฟล์ tls.conf ขึ้นมาทำงาน
Include /etc/proftpd/tls.conf
ติดตั้ง Firewalld เพิ่ม
apt install firewalld
เพิ่ม Rul firewall
firewall-cmd --zone=public --permanent --add-service=ftp
firewall-cmd --zone=public --permanent --add-port=6000-6100/tcp
* ปรับไฟล์ /etc/proftpd/proftpd.conf เพื่อเปิด PassivePorts ให้ Login FTP ผ่าน FileZilla ได้
[...]DefaultRoot                     ~ !adm
PassivePorts    6000    6100
[...]
Ref: proftpd
---------------------------------------------------------------------------------------------------------
ปรับเพิ่มเติมให้เฉพาะ user สามารถ log in FTP ได้ บาง user ไม่ให้เข้าใช้งาน FTP
ปรับแก้ไฟล์ /etc/passwd เช่น
www-data:x:33:33:www-data:/var/www:/usr/sbin/nologin
แก้ไขเป็น
www-data:x:33:33:www-data:/var/www:/usr/bin/false
-----------------------------------------------------------------------------------------------------------
Install quota on Debian 9
how-to-set-filesystem-quotas-on-debian-9
Set Quota:
Check quota on : quotaon -v /home
Add quota user: setquota -u logwin 10240M 10752M 0 0 /home
Edit quota user: edquota -u logwin
View quota user: quota -vs logwin
Report quota: repquota -s /home
ปรับให้การส่งเมลจาก root สแต้มด้วยชื่อที่ต้องการ เช่น Administrator
การปรับชื่อ Display ที่เกิดจากการส่งเมล Alert ของ user : root ให้สแต้มด้วยชื่อ Administrator แทน root
ตัวอย่าง

ให้แก้ไขไฟล์ /etc/passwd เปลี่ยน roo:x:0:0:root:/root:/bin/bash เป็นชื่อที่ต้องการดังภาพด้านล่าง

ตัวอย่าง
ให้แก้ไขไฟล์ /etc/passwd เปลี่ยน roo:x:0:0:root:/root:/bin/bash เป็นชื่อที่ต้องการดังภาพด้านล่าง
Monday, February 6, 2017
Sunday, February 5, 2017
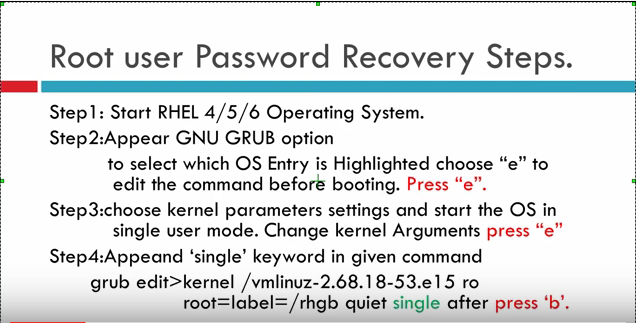
how to recovery password root on Redhat
1. when start press ' e '
2. choose OS press ' e ' again
3. Type single press enter
4. press 'b' to boot recovery

Ref: https://www.youtube.com/watch?v=GpP2r44cVjk
2. choose OS press ' e ' again
3. Type single press enter
4. press 'b' to boot recovery
Ref: https://www.youtube.com/watch?v=GpP2r44cVjk
Tuesday, January 31, 2017
how to convert file .msg(Mail from Mslook) to open on Thunderbird
wget http://www.matijs.net/software/msgconv/msgconvert.pl
sudo apt-get install libemail-outlook-message-perl
sudo apt-get install libemail-localdelivery-perl
perl msgconvert.pl YourMessage.msg
Ref:
how-do-i-view-an-outlook-msg-file
how-to-view-msg-files-on-ubuntu
for windows
Saturday, January 28, 2017
command check package version on ubuntu, debain
1. apt list package name
apt list pv
Listing... Done
pv/kali-rolling,now 1.6.0-1 i386 [installed]
apt list htop
apt list vim
2. aptitude versions package name
aptitude versions pv
i 1.6.0-1 kali-rolling 500
aptitude versions htop
aptitude versions vim
3. dpkg -s package name
dpkg -s pv
or
dpkg -s pv |grep -i version
Version: 1.6.0-1
Ref:
debian-ubuntu-linux-apt-get-aptitude-show-package-version-command
Monday, January 23, 2017
การโอนข้อมูลระหว่างเครื่อง Linux 2 เครื่อง และแสดง Process ระหว่างส่งไฟล์
1. ต้องติดตั้งโปแรกม nc เพื่อส่ง-รับข้อมูล และโปรแกรม pv เพื่อแสดง process
2. การติดตั้ง
3. เครื่อง Linux 1 รันคำสั่ง (เครื่องส่ง) ip: 192.168.1.4
อธิบายคำสั่ง
4. เครื่อง Linux 2 (เครื่องรับ/ดาวน์โหลด) ip: 192.168.1.5
Reference
transfer-files-between-two-linux-machines
2. การติดตั้ง
3. เครื่อง Linux 1 รันคำสั่ง (เครื่องส่ง) ip: 192.168.1.4
อธิบายคำสั่ง
- tar -zcf = tar is a tape archive utility used to compress/uncompress archive files and arguments -c creates a new .tar archive file, -f specify type of the archive file and -z filter archive through gzip.
- CentOS-7-x86_64-DVD-1503.iso = Specify the file name to send over network, it can be file or path to a directory.
- pv = Pipe Viewer to monitor progress of data.
- nc -l -p 5555 -q 5 = Networking tool used for send and receive data over tcp and arguments -l used to listen for an incoming connection, -p 555 specifies the source port to use and -q 5 waits the number of seconds and then quit.
4. เครื่อง Linux 2 (เครื่องรับ/ดาวน์โหลด) ip: 192.168.1.5
Reference
transfer-files-between-two-linux-machines